Building a 2D Vector Type
Learn the foundations of vector math to work with positions and movements, and create a custom type to apply these concepts
In previous lessons, we hinted at a custom type that could store a two-dimensional vector, which we can use to represent positions in a space. Such a type is typically called a vector, and they are the fundamental building block of computer graphics, simulation, and more.
Throughout the rest of this chapter, we'll use them to represent concepts like positions, movements, directions, accelerations, and forces.
In this lesson, we'll implement a Vec2 type that can represent positions, movements, and forces in a 2D space by equipping our vector with operations like addition, subtraction, and scalar multiplication. This foundation will serve us well throughout the remainder of this chapter as we build increasingly sophisticated graphics and physics systems for our games.
Why Should We Use Vectors?
The key advantage of using the concept of a vector for variables representing things like positions and movement is that these variables can then interact with each other in a systemic way to easily build more complex behaviors. The rules governing how vectors interact with each other are the rules of vector math.
Like with simple numeric operations, vector math is typically implemented using operators like +, -, and +=.
In the following example, we represent a Character object's position as a vector, and we also accept movement instructions in the form of a vector. We can add the current position vector and movement vector together to get the new position:
#include <iostream>
// Vec2.h doesn't exist yet, but we'll create
// it in this lesson
#include "Vec2.h"
class Character {
public:
void Move(Vec2 Movement) {
Position += Movement;
}
Vec2 Position{1, 2};
};
int main() {
Character C;
C.Move({2, 3});
std::cout << "New Position: (" << C.Position.x
<< ", " << C.Position.y << ")";
}New Position: (3, 5)In this example, we represent a target position as a vector. We can then get the movement vector required to travel from the current position to that target position using vector subtraction:
#include <iostream>
#include "Vec2.h"
class Character {
public:
Vec2 GetPath(const Vec2& Destination) {
return Destination - Position;
}
Vec2 Position{1, 2};
};
int main() {
Character C;
Vec2 Path{C.GetPath({5, 5})};
std::cout << "Path from current position to"
" (5, 5): (" << Path.x << ", " << Path.y << ")";
}Path from current position to (5, 5): (4, 3)A concept like maximum movement speed can be created by multiplying a directional vector by a simple numeric type, like a float. Below, we provide our Character with a directional vector, and we control how far the character moves in that direction by multiplying the vector by a scalar representing the character's maximum movement speed:
#include <iostream>
#include "Vec2.h"
class Character {
public:
void MoveInDirection(Vec2 Direction) {
Position += Direction * MaxSpeed;
}
Vec2 Position{1, 2};
float MaxSpeed{5.0};
};
int main() {
Character C;
C.MoveInDirection({1, 1});
std::cout << "New Position: ("
<< C.Position.x << ", "
<< C.Position.y << ")";
}New Position: (6, 7)We'll implement all these techniques and more throughout the remainder of the chapter. In this lesson, we'll cover the vector math that makes this possible, and we'll create the vector type Vec2 that implements these operations. The starting point for our Vec2 type looks like this:
// Vec2.h
#pragma once
struct Vec2 {
float x;
float y;
};The 2 in this name represents that, we're working with two-dimensional spaces, so our vector will also be two-dimensional, using x and y coordinates.
Everything we cover in this lesson can easily be adapted to three dimensions - we simply add a third coordinate (typically called z) and extend our member functions to update it in the same way we update the other components.
Length / Magnitude
The length of a vector, sometimes also called its magnitude, is a single number representing how far away it is from the origin. This vector has a magnitude of :
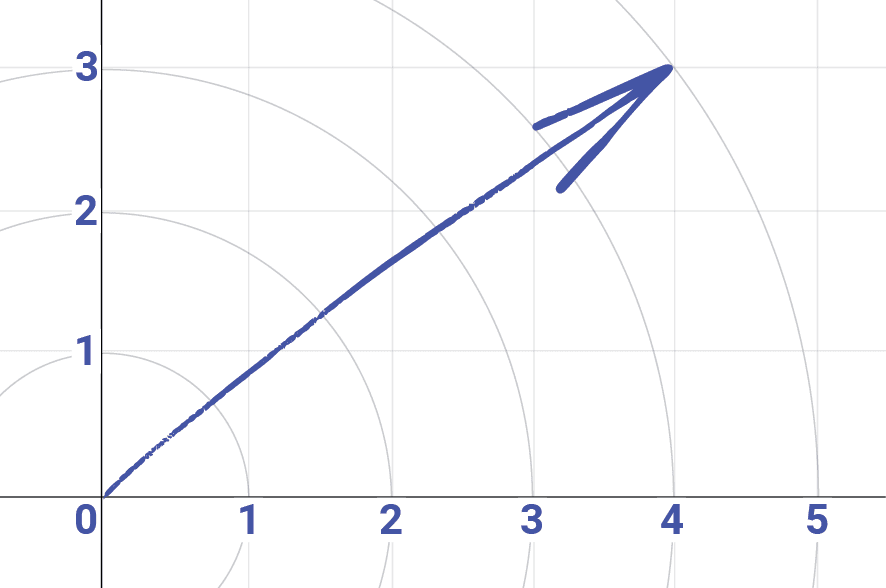
Previously, we saw how we can represent the magnitude of a vector as the hypotenuse of a right-angled triangle, thereby allowing it to be calculated by the Pythagorean theorem. The non-hypotenuse edges of this triangle are simply the individual components of the vector, which are the x and y member variables in our case:
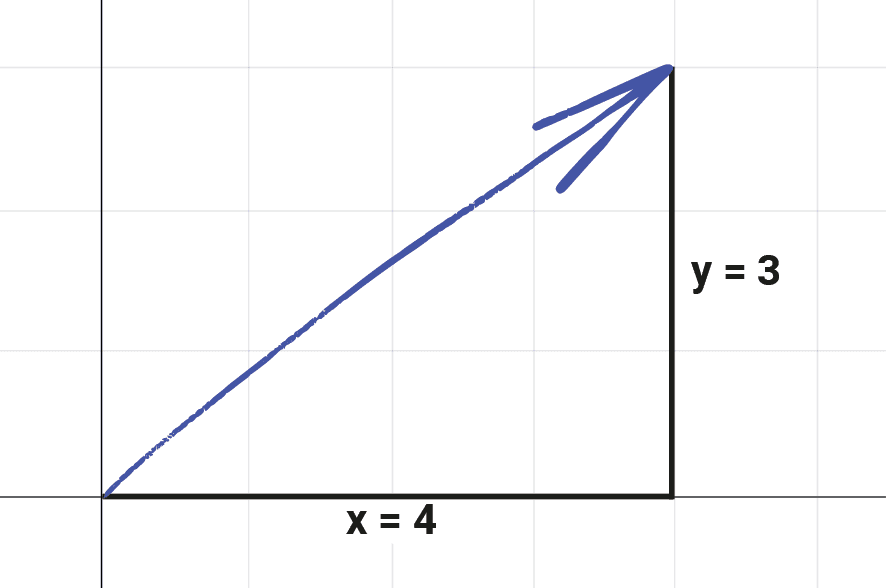
The length/magnitude of a vector is usually represented by vertical bars. For example, refers to the magnitude of . Combining this with the Pythagorean theorem, we have:
Let's add this to our Vec2 struct as a function called GetLength():
// Vec2.h
// ...
#include <cmath>
struct Vec2 {
// ...
float GetLength() const {
return std::sqrt(x * x + y * y);
}
};Distance
As we covered earlier, the distance formula lets us calculate the distance between two points or, equivalently, two vectors:
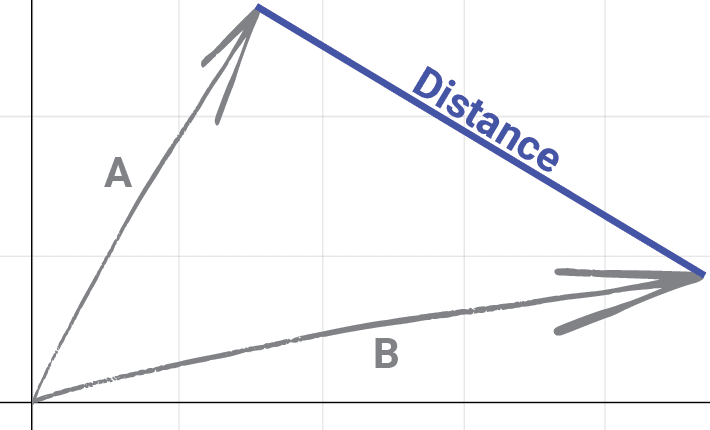
If we have two vectors, and , the distance between them can be calculated as follows:
This is the geometric equivalent of constructing a right-angled triangle from our two input vectors, and then calculating the length of the hypotenuse of that triangle:

Let's add this as a function to our struct:
// Vec2.h
// ...
struct Vec2 {
// ...
float GetDistance(const Vec2& Other) const {
return std::sqrt(
std::pow(x - Other.x, 2) +
std::pow(y - Other.y, 2)
);
}
};Scalar Multiplication and Division
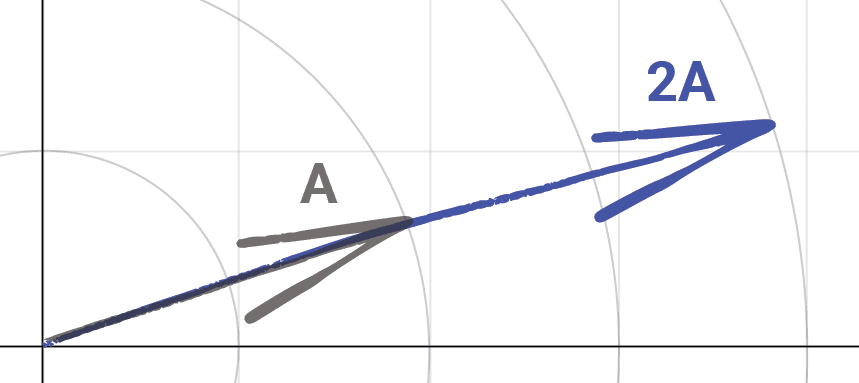
To multiply a vector by a scalar (a simple number, like an int or a float), we just multiply every component by that scalar. For example, multiplying a vector by looks like this:
A math expression like is typically abbreviated to just .
The geometric effect of scalar multiplication of a vector is to return a vector that has the same direction, but a different length:
The most natural way to allow our Vec2 objects to be multiplied by scalars is to overload the * and / operators, allowing us to write expressions like SomeVector * 2. We covered operator overloading in more detail in our introductory course:
Operator Overloading
This lesson introduces operator overloading, a fundamental concept to create more intuitive and readable code by customizing operators for user-defined types
Let's use this to allow Vec2 objects to be multiplied by a float, or other scalar types that are convertible to a float:
// Vec2.h
// ...
struct Vec2 {
// ...
Vec2 operator*(float Multiplier) const {
return Vec2 {
x * Multiplier,
y * Multiplier
};
}
};Scalar division works in the exact same way. We need to add a check to ensure we're not trying to divide by zero. Depending on our needs, we may want to implement some appropriate error handling or reporting in this scenario. For now, we'll just return a {0, 0} vector if someone tries to divide by zero using this operator:
// Vec2.h
// ...
struct Vec2 {
// ...
Vec2 operator/(float Divisor) const {
if (Divisor == 0.0f) {
return Vec2{0, 0};
}
return Vec2 {
x / Divisor,
y / Divisor
};
}
};Multiplicative Assignment: *= and /=
Let's implement the compound assignment versions of scalar multiplication: *= and scalar division: /=.
For example, if we have a vector A whose current value is {1, 2}, an expression like A *= 2 should update the value to be {2, 4}.
An additional important point is that these operators should return a reference to the vector. This is to allow the operations to be used in more complex expressions:
#include <iostream>
#include "Vec2.h"
int main() {
Vec2 MyVec{1, 2};
(MyVec *= 4) /= 2;
std::cout << MyVec.x << ", " << MyVec.y;
}2, 4As such, we'll set the return type of our operator to be a Vec2&, which is a reference to a Vec2. We'll return the reference to the vector our operator was called on using the this pointer:
// Vec2.h
// ...
struct Vec2 {
// ...
Vec2& operator*=(float Multiplier) {
x *= Multiplier;
y *= Multiplier;
return *this;
}
};We covered the this operator and compound assignment operators in more detail in our introductory course:
The this Pointer
Learn about the this pointer in C++ programming, focusing on its application in identifying callers, chaining functions, and overloading operators.
Let's implement the /= operator in the same way. Again, we'll add a check to ensure we're not trying to divide by zero:
// Vec2.h
// ...
struct Vec2 {
// ...
Vec2& operator/=(float Divisor) {
if (Divisor == 0.0f) {
return *this;
}
x /= Divisor;
y /= Divisor;
return *this;
}
};Unary Negation
The operators we've overloaded so far are binary - that is, they take two operands, a left and a right. A unary operator takes only a single operand. The increment (++) and decrement (--) operators are likely to be the unary operators you're most familiar with.
However, the most important unary operator for vectors is the simple -, sometimes called the unary negation operator. We're likely familiar with how this works with simple numbers. For example, if x is the integer 10, the expression -x will return -10.
Unary negation also applies to vectors - we simply return a vector with every component negated. Visually, we can imagine it returning a vector with the same magnitude, but in the opposite direction:
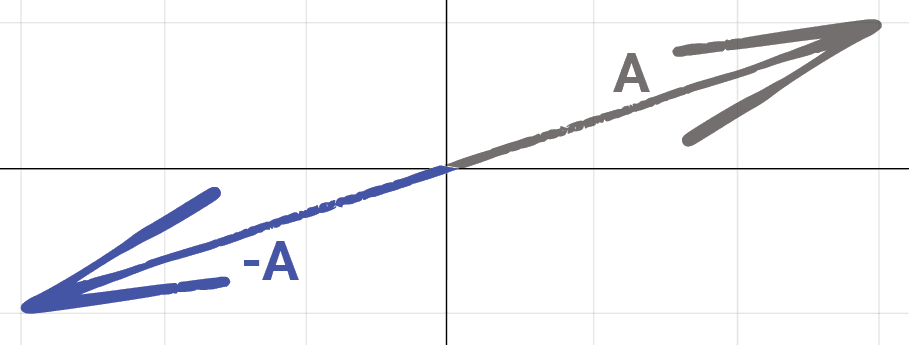
Let's add it to our struct:
// Vec2.h
// ...
struct Vec2 {
// ...
Vec2 operator-() const {
return Vec2 {-x, -y};
}
};Addition and Subtraction
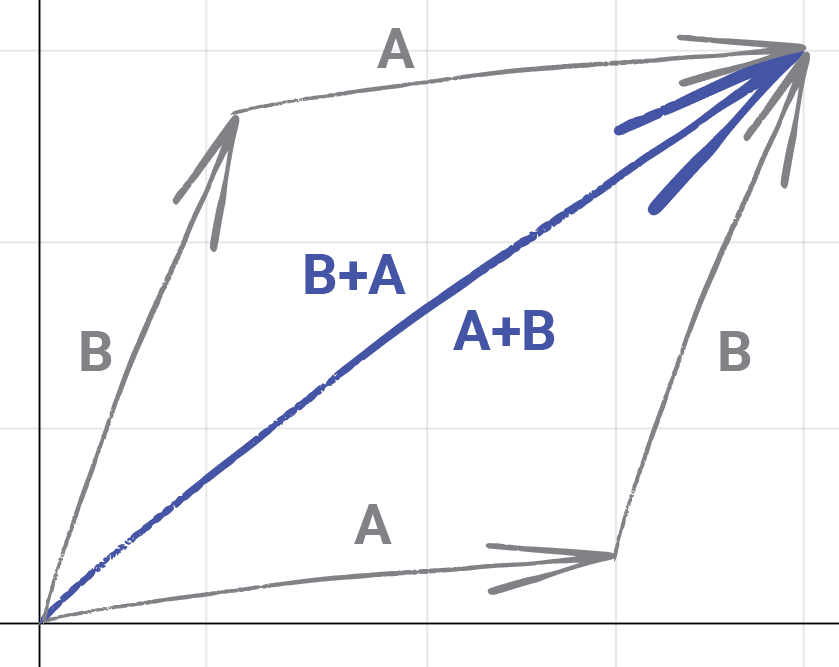
For vector addition and subtraction, we simply add or subtract the corresponding components:
Visually, addition is like attaching the "start" of one vector to the "end" of the other, and then returning the new vector generated by that combination:
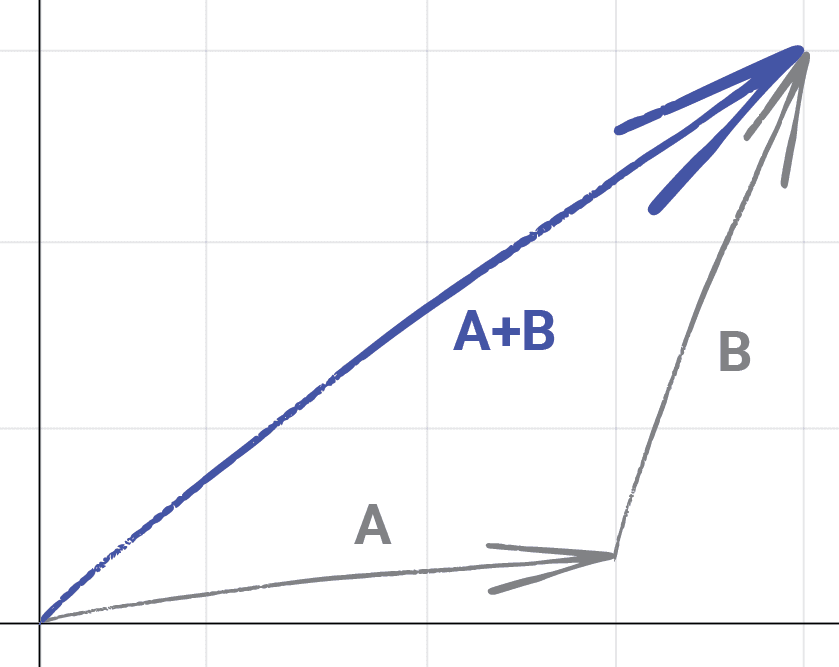
The order of the operands doesn't matter for vector addition, as will have the same result as :
For subtraction, we position the "start" of our two vectors together, and then construct and return the result of comparing their two "ends".

The operand order does matter for subtraction. and will have the same magnitude but will point in opposite directions. In other words, if , then
Let's add addition and subtraction to our struct:
// Vec2.h
// ...
struct Vec2 {
// ...
Vec2 operator+(const Vec2& Other) const {
return Vec2 {
x + Other.x,
y + Other.y
};
}
Vec2 operator-(const Vec2& Other) const {
return Vec2 {
x - Other.x,
y - Other.y
};
}
};Additive Assignment: += and -=
We can implement the compound assignment variations of addition and subtraction in the normal way:
// Vec2.h
// ...
struct Vec2 {
// ...
Vec2& operator+=(const Vec2& Other) {
x += Other.x;
y += Other.y;
return *this;
}
Vec2& operator-=(const Vec2& Other) {
x -= Other.x;
y -= Other.y;
return *this;
}
};Commutative Operations
A commutative operation is one where the order of operands does not matter. For example, we usually think of multiplication as commutative, as is equivalent to .
This is true of basic numbers, but multiplication is not commutative for all types and, by default, C++ assumes that the operators we define are not commutative.
As such, our previous overloading of the * operator supports Vec2 * float expressions, but it doesn't support float * Vec2.
#include "Vec2.h"
int main() {
Vec2 A{1.0, 2.0};
A * 2.0;
2.0 * A;
}error C2677: binary '*': no global operator found which takes type 'Vec2' (or there is no acceptable conversion)When working with vectors, it happens to be the case that scalar multiplication is commutative - that is Vec2 * float and float * Vec2 are equivalent. So, we can implement the float * Vec2 variation using the same logic we had for Vec2 * float.
Given that the left operand will be a float, we're overloading the * operator for the float type rather than for the Vec2 type. As such, this overload cannot be a Vec2 member function - rather, we need to define a free function.
But even though we can't define it as part of the Vec2 struct, we'd want it close to our existing Vec2 code to keep our project organized. In this case, we'll define it in the Vec2.h header file, right after the Vec2 struct:
// Vec2.h
// ...
struct Vec2 {
// ...
};
inline Vec2 operator*(float M, const Vec2& V) {
return Vec2{V.x * M, V.y * M};
}Reusing Operators
When we're adding a full suite of operators to our custom types, there are usually opportunities to make our lives easier by writing some operators in terms of other, existing operators.
Commutative operations are the prime candidates for this. For example, if Vec2 * float is equivalent to float * Vec2, we can fully implement one of them, and then have the other simply call that implementation by reordering the operands. So, our previous function can be simplified to this:
// Vec2.h
// ...
struct Vec2 {
// ...
};
inline Vec2 operator*(float M, const Vec2& V) {
// Before:
return Vec2{V.x * M, V.y * M};
// After:
return V * M;
}There are more opportunities to apply similar techniques. For example, let's imagine we're trying to implement the binary - operator, to support expressions such as A - B. We can rewrite this A - B expression into an equivalent expression that does not use the binary - operator.
For example, we can write it using binary + operator and unary - operator instead:
This is useful if our custom type already has the binary + operator and unary - operator, as we can now reuse them to create our binary - operator:
// Vec2.h
// ...
struct Vec2 {
// ...
Vec2 operator-(const Vec2& Other) const {
// Before:
return Vec2 {
x - Other.x,
y - Other.y
};
// After:
return *this + (-Other);
}
};We can take similar shortcuts with other operators. For example, A -= B is equivalent to A += (-B), so our -= operator can be written as:
// Vec2.h
// ...
struct Vec2 {
// ...
Vec2& operator-=(const Vec2& Other) {
// Before:
x -= Other.x;
y -= Other.y;
return *this;
// After:
return *this += (-Other);
}
};We can also rewrite our GetDistance() function in terms of the binary - operator and the GetLength() method. This a bit less obvious and may require some consideration.
The key realization is that getting the distance between two vectors is equivalent to subtracting one from the other, and getting the length of this new vector. So, the distance between and is equivalent to the length of :
Applying this logic to our GetDistance() function might look like this:
// Vec2.h
// ...
struct Vec2 {
// ...
float GetDistance(const Vec2& Other) const {
// Before:
return std::sqrt(
std::pow(x - Other.x, 2) +
std::pow(y - Other.y, 2)
);
// After:
return (*this - Other).GetLength();
}
};It's useful to be on the lookout for when operators or methods can be written in terms of operators and methods we already have. This is particularly helpful when writing operators and methods that are more complicated, as reusing existing functionality can significantly reduce the amount of code we need to write and maintain.
Overloading the << Operator
Finally, let's allow our Vec2 objects to easily be streamed to the console, using the << operator. We covered this topic in more detail in our beginner course:
Overloading the << Operator
Learn how to overload the << operator, so our custom types can stream information directly to the console using std::cout
The key point is that, in an expression like std::cout << MyVector, the std::cout object is the left operand rather than our vector. As such, rather than overloading the << operator for our Vec2 type, we instead need to overload it for std::cout's type, which is std::ostream:
// Vec2.h
#pragma once
#include <iostream>
// ...
struct Vec2 {
// ...
};
inline std::ostream& operator<<(
std::ostream& Stream, const Vec2& V
) {
Stream << "{ x = " << V.x
<< ", y = " << V.y << " }";
return Stream;
}Let's see our overload in action:
#include <iostream>
#include "Vec2.h"
int main() {
Vec2 MyVec{1, 2};
std::cout << MyVec;
}{ x = 1, y = 2 }Complete Vec2 Struct
With all our changes in place, our Vec2 struct looks as follows. We'll reuse this type regularly through the remaining lessons, so it's helpful to have a complete version:
Summary
Vector mathematics forms the foundation of computer graphics, game physics, and simulation. In this lesson, we've built a complete Vec2 struct capable of representing positions, movements, and forces in a 2D space.
Through operator overloading, we've created an intuitive interface that allows vector operations to be written with natural syntax like addition and multiplication. Key takeaways:
- Vectors are useful for representing positions, movements, directions, and forces in game development
- The
Vec2struct uses operator overloading to provide intuitive syntax for vector operations - Vector operations include addition, subtraction, scalar multiplication, and finding lengths/distances
- Properly implementing
constcorrectness can make our code more robust and reduce the probability we introduce bugs in the future - Reusing operators by implementing some in terms of others reduces code duplication
- The
inlinekeyword helps us avoid duplicate definition errors when implementing free functions in headers - Overloading stream operators enables easy debugging by allowing vectors to be printed
With our Vec2 implementation complete, we now have a tool that will serve as the foundation for the graphics and physics systems we'll develop throughout the rest of the course.
Moving Objects with Vectors
Explore how to use vectors for representing positions, directions, and implementing speed-limited movement in games.