Moving Objects with Vectors
Explore how to use vectors for representing positions, directions, and implementing speed-limited movement in games.
In this lesson, we'll see some examples of how we can use our new Vec2 type to support functionality like positioning and moving objects within our game world.
We'll see how vectors provide elegant solutions for positioning and moving objects in a game world. We'll implement a character movement system that handles speed limits, direction calculations, and smooth transitions between positions. Later in the course, we'll build on these techniques, introducing concepts like acceleration, gravity, and other forces to our movement logic.
The examples in this lesson use the Vec2 type we created in the previous section. A complete version of this struct is available below:
Vector Representations
As we've seen, a vector is simply a collection of numbers - one number per dimension. Vectors can be used to represent a wide range of concepts and, once we're using vectors for those representations, the concepts can interact with each other by applying the rules of vector math. Below, we introduce some of the ideas we'll be using vectors to represent,
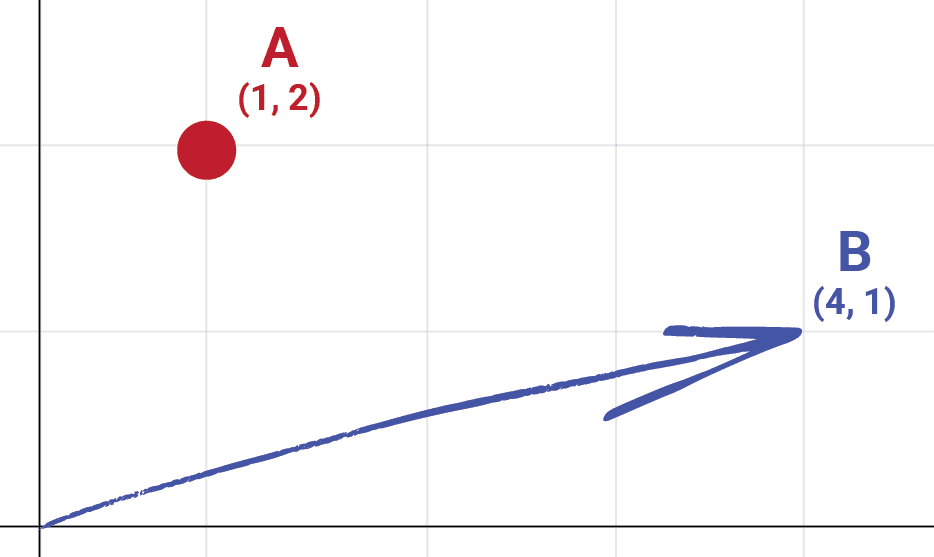
Positions
The most common use for a vector type is to represent a position in our space, such as where an object is currently located in our world.
Visually, position vectors are typically represented simply by points within the space, or arrows pointing from the origin to that position:
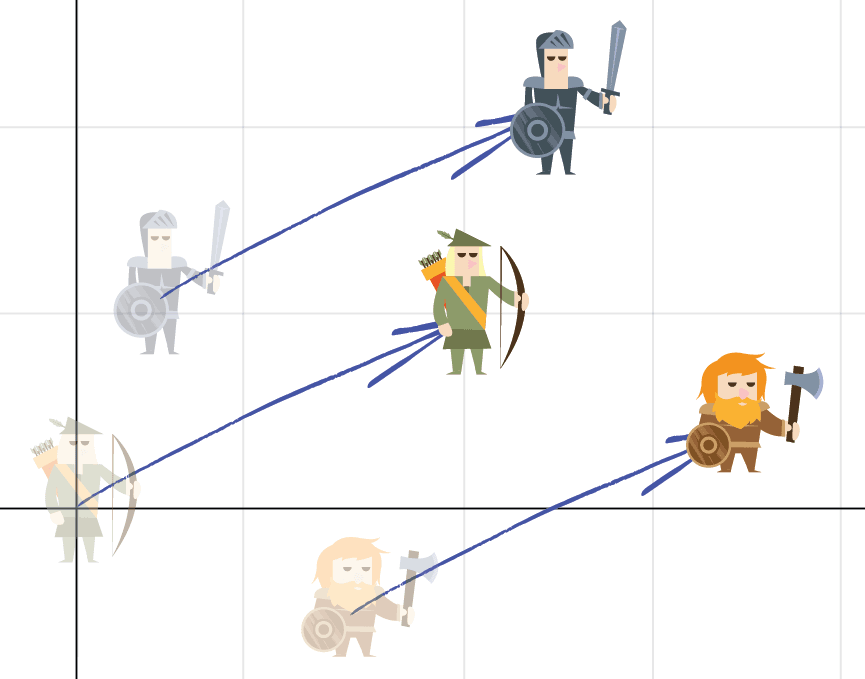
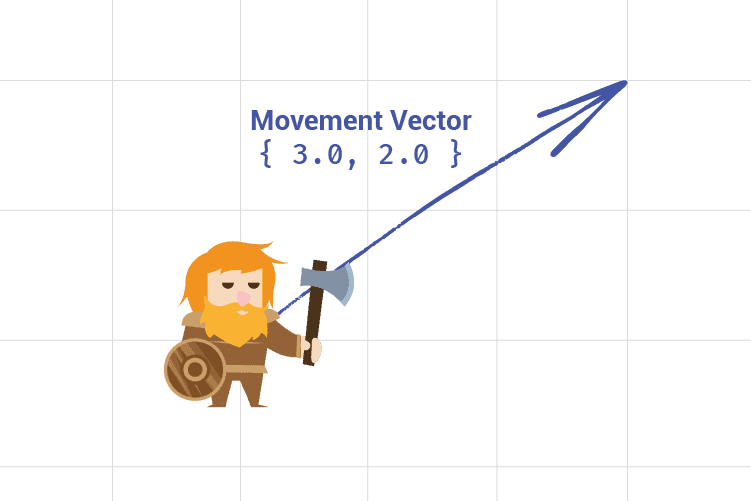
Movement
In this case, the vector represents an object moving to some new position based on their starting position, and the components of the movement vector. Movement vectors are typically represented by arrows but, unlike position vectors, they don't always begin at the origin.
Below, we show the same movement vector, , applied to three different characters, each in a different starting position:
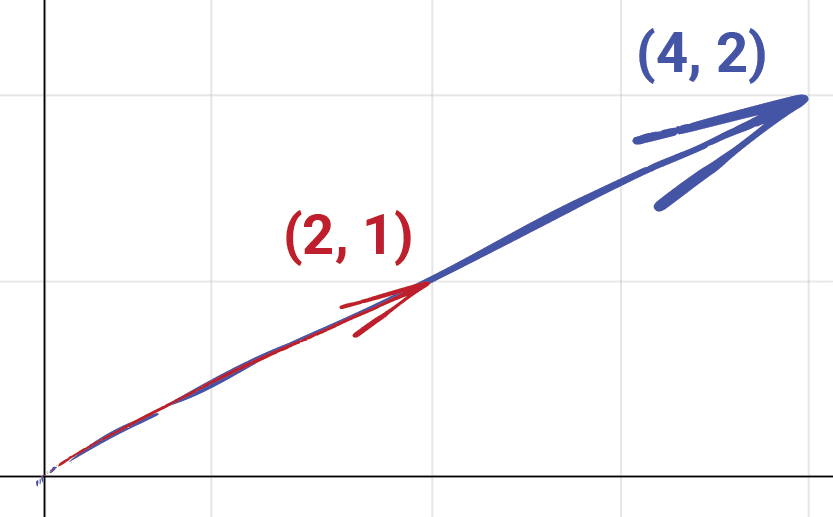
Directions
Vectors can also represent directions, such as the direction that a character is facing.
When we use a vector to represent a direction, the key information we care about is not necessarily the overall value of the vector's components - rather, we care about their values in proportion to each other.
For example, the vectors and both point in the same direction so, if these vectors represented a direction, they'd be equivalent:
However, it's often convenient that a vector representing a direction be normalized, meaning that we scale its components such that the vector continues to point in the same direction, but its overall length is .
If two vectors point in the same direction, their normalized form will be identical. For example, the normalized form of both and is the same, and approximately equal to :
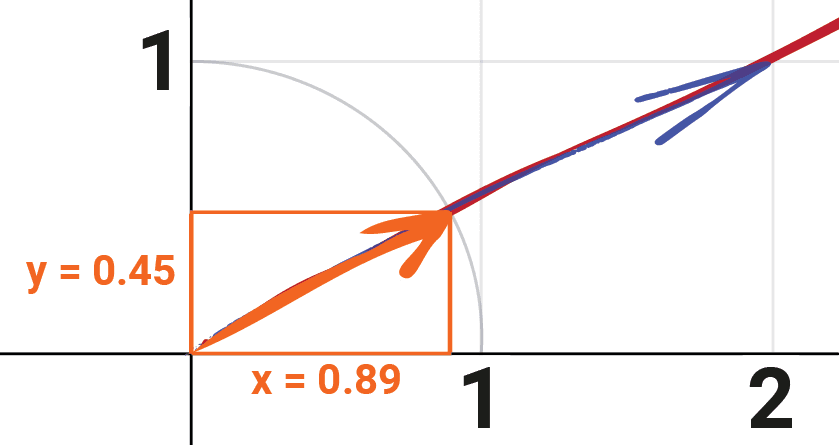
We can confirm the length of is approximately using the GetLength() method of our Vec2:
#include <iostream>
#include "Vec2.h"
int main() {
std::cout << Vec2({0.89, 0.45}).GetLength();
}0.997296We cover how to calculate these values for any vector, and an example of where vector normalization is useful, later in this lesson.
Accelerations, Forces, and More
Later in the course, we'll use vectors to represent other concepts, such as accelerations and forces. For example, we'll use the direction of the vector to represent the direction in which the force acts and the length of the vector to represent how powerful that force is.
Position Vectors
Now that we have a type to represent two-dimensional vectors, we can use an instance of this type to store where an object is positioned in our 2D game world.
We'll use the x member to represent the object's horizontal position, and y to represent the vertical position. Below, we have a Character type whose objects are initialized with the position x = 5, y = 1:
// Character.h
#pragma once
#include "Vec2.h"
class Character {
public:
Vec2 Position { 5, 1 };
};Movement Vectors
We can also use vectors to represent movement within our world. Our objects have a current position, and some position they want to move to. We can represent the difference between these two positions as a vector:
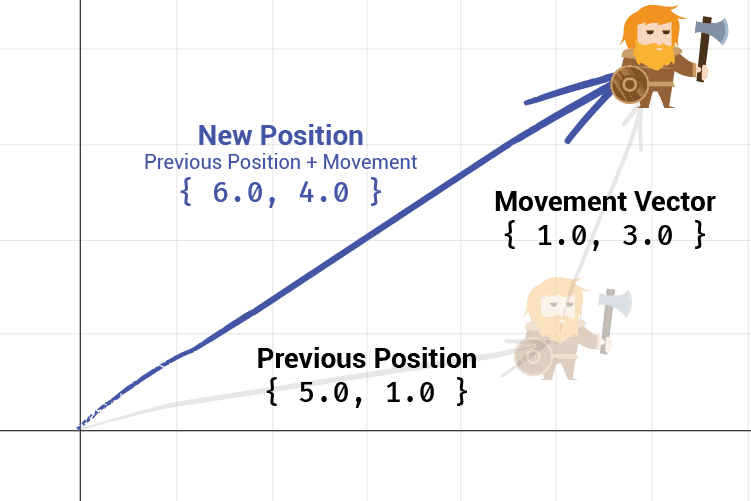
To determine the position of an object after applying a movement, we add the movement vector to the current position vector.
For example, let's imagine our character was initially at position { 5, 1 } and a movement vector of { 1, 3 } was applied. The character's new position will be the result of adding those two vectors: { 5 + 1, 1 + 3 } which is { 6, 4 }:
Let's add a Move() method to our Character class to support this, using the += operator we overloaded within our Vec2 type:
// Character.h
#pragma once
#include "Vec2.h"
class Character {
public:
Vec2 Position { 5, 1 };
void Move(const Vec2& Movement) {
Position += Movement;
}
};// main.cpp
#include <iostream>
#include "Vec2.h"
#include "Character.h"
int main() {
Character C;
std::cout << "Starting Position: " << C.Position;
Vec2 MovementVector { 3, 2 };
std::cout << "\nMovement Vector: " << MovementVector;
C.Move(MovementVector);
std::cout << "\nNew Position: " << C.Position;
}Starting Position: { x = 5, y = 1 }
Movement Vector: { x = 3, y = 2 }
New Position: { x = 8, y = 3 }Normalizing Vectors
When we're implementing logic using vectors, it is often useful to work with normalized vectors, that is, vectors that have a length of . We previously saw how we could calculate the length (also called the size or magnitude) of a vector using the Pythagorean theorem:
We made this available as the GetLength() function within our Vec2 struct. A normalized vector shares the same direction as the original vector, but it has a length of 1:
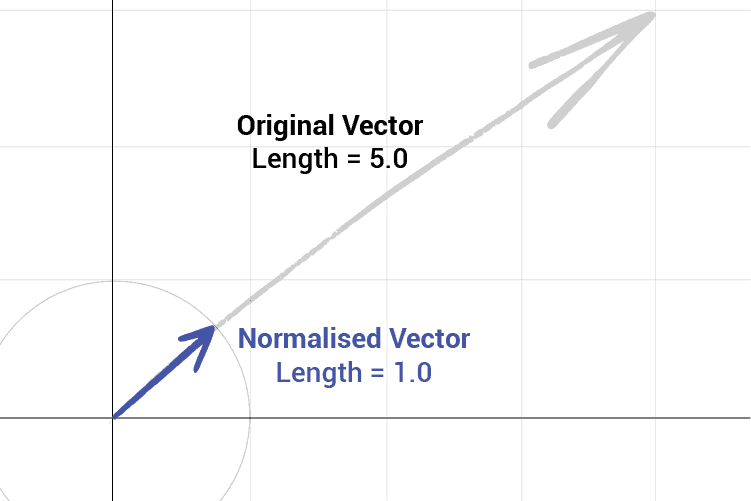
To calculate the normalized form of some vector, we divide the vector by its own length.
Let's imagine we have the vector { 234, 105 }. Applying the Pythagorean theorem, we'd find the length of this vector turns out to be approximately 256. So, to normalize this vector, we'd divide it by that value:
// main.cpp
#include <iostream>
#include "Vec2.h"
int main() {
Vec2 V { 234, 105 };
std::cout << "Vector Length: " << V.GetLength();
std::cout << "\nNormalized: "
<< V / V.GetLength();
}This yields approximately { 0.91, 0.41 }:
Vector Length: 256.478
Normalized: { x = 0.912359, y = 0.409392 }If we calculate the length of this new vector, we'd find it to be approximately 1.0, as planned:
// main.cpp
#include <iostream>
#include "Vec2.h"
int main() {
Vec2 V { 234, 105 };
Vec2 Normalized {V / V.GetLength()};
std::cout << "Normalized Length: "
<< Normalized.GetLength();
}Normalized Length: 1That means { 0.91, 0.41 } is the approximate normalized form of { 234.0, 105.0 }. We can add a new Normalize() method to our Vec2 type to encapsulate this logic. We'll also add a check to ensure we don't try to divide by zero:
// Vec2.h
#pragma once
struct Vec2 {
float x;
float y;
Vec2 Normalize() const {
float Length{GetLength()};
if (Length == 0.0f) {
return Vec2{0, 0};
}
return *this / Length;
}
// ...
}Unit Vectors and Notation
If a vector has a length of , it is called a unit vector. For example, and are both unit vectors. The vector we calculated in this section - - is also a unit vector.
In mathematical notation, a unit vector is typically represented using the ^ symbol, called a circumflex or hat. For example, the unit vector associated with a vector called would be .
As we've seen, the equation for calculating a unit vector involves dividing a vector by its length. We represent the length of a vector using vertical bars, such as . Combining all these conventions, we have:
Limiting Movement Speed
Typically, we don't want our objects to immediately teleport to their destination. Instead, we usually want characters to move towards a location over multiple steps. For example, in a turn-based game, it might take a character 3 turns to reach a destination, or 10 seconds in a real-time game.
For now, we'll limit how far our Character objects can move on each invocation of the Move() function. Later in the chapter, we'll use these techniques for real-time movement where our objects take a tiny step toward their destination on each frame.
Let's start by adding a MovementSpeed variable to our Character class, controlling how fast they can move:
// Character.h
#pragma once
#include "Vec2.h"
class Character {
public:
Vec2 Position { 2.0, 6.0 };
float MovementSpeed { 3.0 };
};We then need to update our Move() function to constrain the movement speed based on this variable. This has three steps:
- Create a normalized vector from the target vector - that is, a vector with length
1representing the direction we want to move. - Multiply the direction vector by the character's
MovementSpeedto create a new vector representing the direction and distance the character should move in this step - Prevent the
Characterfrom "overshooting" the intended destination.
1. Normalizing the Movement Vector
Let's update the Move() vector of our Character class to get the normalized form of their movement vector. We can then calculate our constrained movement vector by multiplying the normalized form with the character's maximum MovementSpeed.
This ensures the character moves in the same direction requested by the input vector, but doesn't move further in that direction than their movement speed allows:
// Character.h
#pragma once
#include "Vec2.h"
class Character {
public:
Vec2 Position { 2.0, 6.0 };
float MovementSpeed { 3.0 };
void Move(const Vec2& Movement) {
Vec2 Direction{Movement.Normalize()};
Vec2 ConstrainedMovement{Direction * MovementSpeed};
}
};2. Updating Position
Next, let's update the Character object's Position based on this new movement vector, thereby making the character move as far as they can in the direction of their goal:
// Character.h
#pragma once
#include "Vec2.h"
class Character {
public:
Vec2 Position { 2.0, 6.0 };
float MovementSpeed { 3.0 };
void Move(const Vec2& Movement) {
Vec2 Direction{Movement.Normalize()};
Vec2 ConstrainedMovement{Direction * MovementSpeed};
Position += ConstrainedMovement;
}
};3. Prevent Overshooting
In this code, the character will always move the maximum distance permitted by their MovementSpeed. This means if the distance indicated by the Movement vector is shorter than the Character's maximum movement speed, they will move too far and overshoot the intended destination.
We can check for this scenario, and fix this with an if statement. If the length of the input vector is less than or equal to the character's maximum MovementSpeed, we can just move the full length of that vector in this step:
// Character.h
#pragma once
#include "Vec2.h"
class Character {
public:
Vec2 Position { 2.0, 6.0 };
float MovementSpeed { 3.0 };
void Move(const Vec2& Movement) {
// Can the character reach their destination immediately?
if (Movement.GetLength() <= MovementSpeed) {
Position += Movement;
return;
}
Vec2 Direction{Movement.Normalize()};
Vec2 ConstrainedMovement{Direction * MovementSpeed};
Position += ConstrainedMovement;
}
};Moving Towards a Target
Having our Move() function that accepts a specific movement vector is useful but, to make our class friendlier to use, we'd typically want to offer alternative movement options too. For example, supporting an action like "move towards this target position" is likely to be a helpful addition.
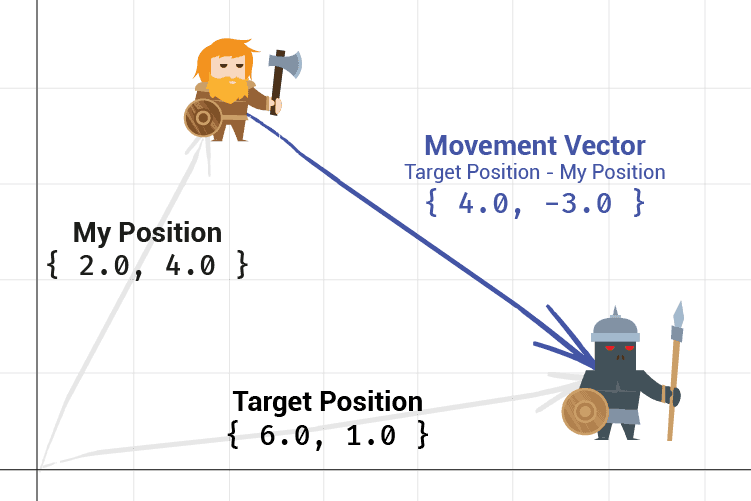
If we have two points in space, represented by the vectors and . The vector that moves from to is the vector returned by subtracting from , that is :
Let's use this to add the MoveTowards() function to our Character class to:
// Character.h
#pragma once
#include "Vec2.h"
class Character {
public:
Vec2 Position { 2.0, 6.0 };
float MovementSpeed { 10.0 };
void Move(const Vec2& Movement){/*...*/}
void MoveTowards(const Character& Target) {
Move(Target.Position - Position);
}
};Moving Away From a Target
We might want to make an evasive archer character that prefers to fight at range, moving away from her targets if they get too close.
To make a character move away from a target, we can simply invert the order of the operands to the - operator:
void MoveTowards(const Character& Target) {
Move(Target.Position - Position);
}
void MoveAway(const Character& Target) {
Move(Position - Target.Position);
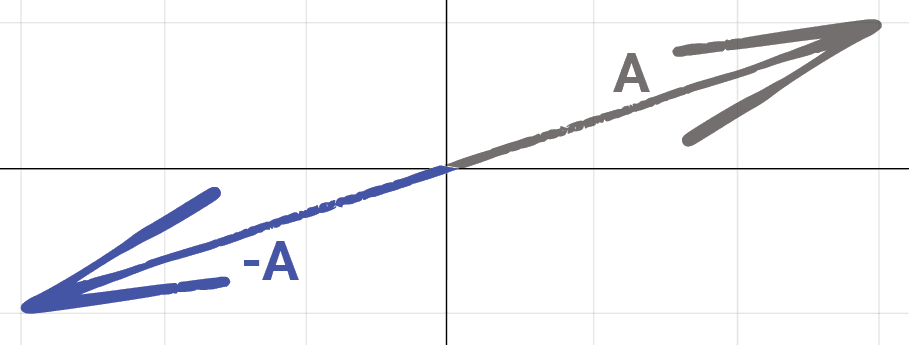
}This works because of a useful property of vectors we covered in the previous lesson: the vectors and have the same length, but point in opposite directions.
Summary
This lesson demonstrated some core, practical applications of vector math. Using our custom Vec2 type, we implemented character movement that handles position tracking, speed limitations, and direction-based movement in a natural way.
Key takeaways:
- Vectors provide a powerful foundation for movement systems
- Position vectors track object locations within the game world
- Movement vectors describe position changes over time or space
- Normalizing vectors creates unit vectors (length = 1) that preserve direction
- Normalized vectors are useful for things like speed-limited movement systems
- Vector subtraction calculates the movement required to reach a target position
- Proper handling of edge cases (like zero-length vectors) is crucial for robust systems
Understanding Screen & World Space
Learn to implement coordinate space conversions in C++ to position game objects correctly on screen.