Cameras and View Space
Create camera systems that follow characters, respond to player input, and properly frame your game scenes.
This legacy content uses SDL2
An updated version using SDL3 is available
In most games, the player cannot view the entire game world at the same time. Rather, we can imagine the player moving a virtual camera around the world and what that camera sees determines what appears on the player's screen.
In a top-down game, for example, they might move that camera by clicking and dragging their mouse. In an action game, the camera is attached to the player they're controlling. As such, we need to show the world from the perspective of that camera. This view is another example of a space, commonly called the view space or camera space.
In this lesson, we'll explore how view space works, we'll implement camera movement controls, and create character-following mechanics.
We'll be using the Vec2 struct we created earlier. A complete version of it is available below:
We'll also be building upon the scene rendering architecture we created in the previous lesson:
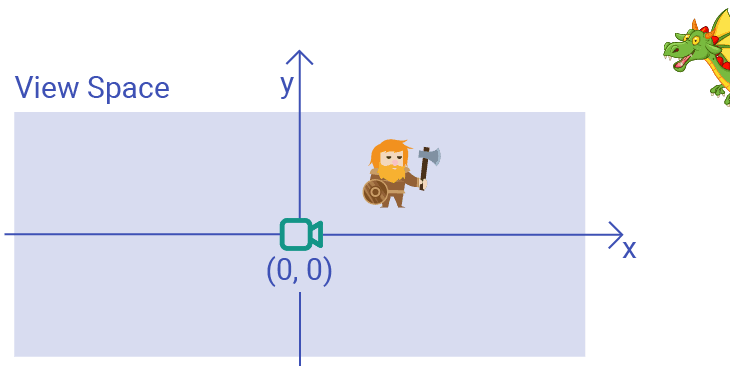
View Space
Let's add a virtual camera to our Scene class. In the minimalist, two-dimensional case, the only property our camera really needs is its position in world space, so our camera can be represented by a simple Vec2:
class Scene {
// ...
private:
Vec2 CameraPosition{0, 0}; // World Space
// ...
};Somewhat counterintuitively, to create the illusion of a camera moving through our world, it's more helpful to imagine that the world is instead moving around a stationary camera.
For example, if we wanted to create the illusion of our virtual camera moving to the left, we instead need to move everything in the world to the right:
class Scene {
// ...
private:
Vec2 CameraPosition{0, 0}; // World Space
Vec2 ToViewSpace(const Vec2& Pos) const {
return {
Pos.x - CameraPosition.x,
Pos.y - CameraPosition.y
};
}
// ...
};Let's update our transformation pipeline to use our ToViewSpace() function. We need to transform our points from world space to view space based on the camera, and then from view space to screen space based on the viewport properties.
Because we're defining our camera's position in world space, it's important that we perform the view space transformations before we convert our vectors to their screen space representations:
// Scene.h
// ...
class Scene {
public:
Vec2 ToScreenSpace(const Vec2& Pos) const {
// Transform to view space...
auto [x, y]{ToViewSpace(Pos)};
// ...then to screen space
auto [vx, vy, vw, vh]{Viewport};
float HorizontalScaling{vw / WorldSpaceWidth};
float VerticalScaling{vh / WorldSpaceHeight};
return {
vx + Pos.x * HorizontalScaling,
vx + x * HorizontalScaling,
vy + (WorldSpaceHeight - Pos.y) * VerticalScaling
vy + (WorldSpaceHeight - y) * VerticalScaling
};
}
// ...
};Camera Movement
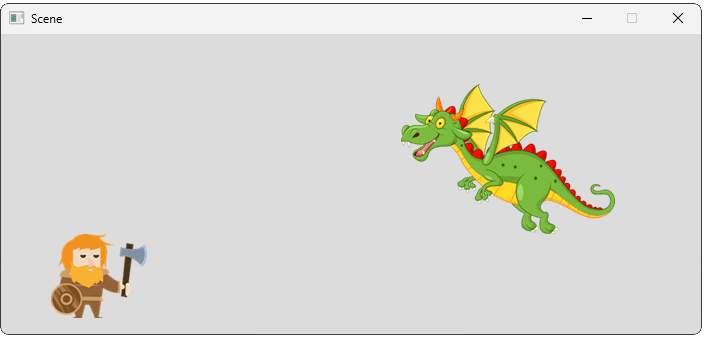
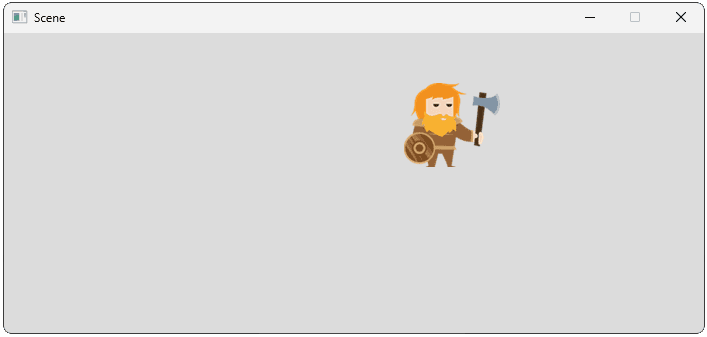
Currently, our camera's position is , so our scene should look the same as before:
Let's move our camera to the right and up to confirm our view updates as expected. Given our camera's position is in world space, we move it right by increasing it's x position, and up by increasing it's y position:
// Scene.h
// ...
class Scene {
// ...
private:
// ...
Vec2 CameraPosition{300, 50}; // World space
};
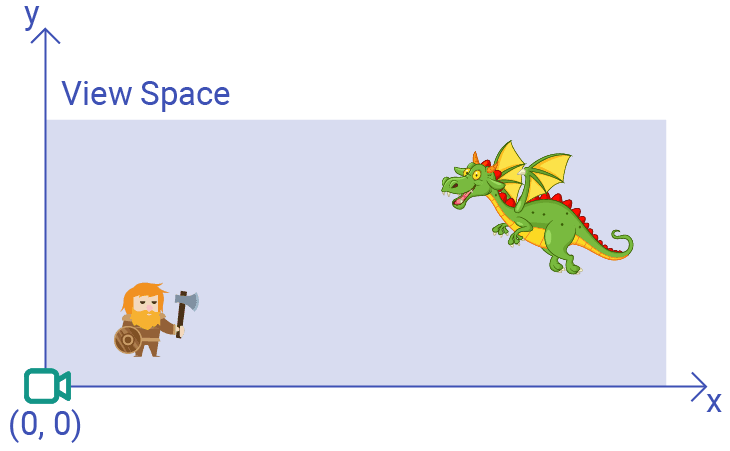
Currently, our view space is defined very similarly to our world space. The only difference is that, in world space, the origin represents the bottom-left of the world whilst, in view space, the origin represents the location of the camera.
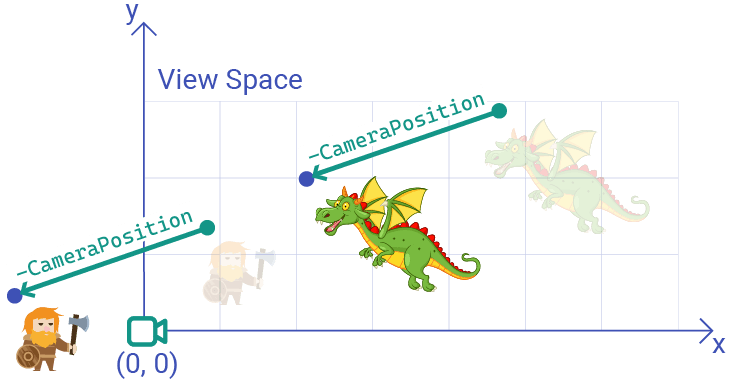
We can visualize the difference as the view space being offset from the world space. The direction and magnitude of that offset is controlled by the CameraPosition vector:

Remember, view space represents the scene as viewed from the perspective of the camera. In view space, the camera doesn't move - it is always at the origin - .
To simulate the effect of a movable camera, we convert world space positions (highlighted in green) to equivalent view space positions (highlighted in blue) by moving them in the opposite direction of the CameraPosition vector.
For example, if our camera moves up and to the right, then from the perspective of the camera, the objects will move down and to the left:
The code in our current ToViewSpace() function implements this:
class Scene {
// ...
private:
Vec2 CameraPosition{0, 0}; // World Space
Vec2 ToViewSpace(const Vec2& Pos) const {
return {
Pos.x - CameraPosition.x,
Pos.y - CameraPosition.y
};
}
// ...
};Field of View
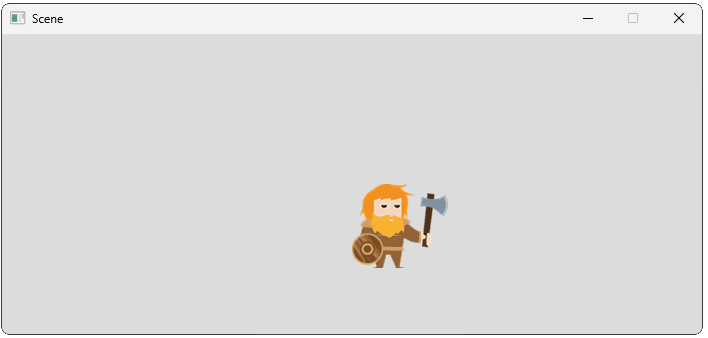
If our CameraPosition is , our world space and view space are identical, so effectively no transformation happens. As such, our scene would look like this:
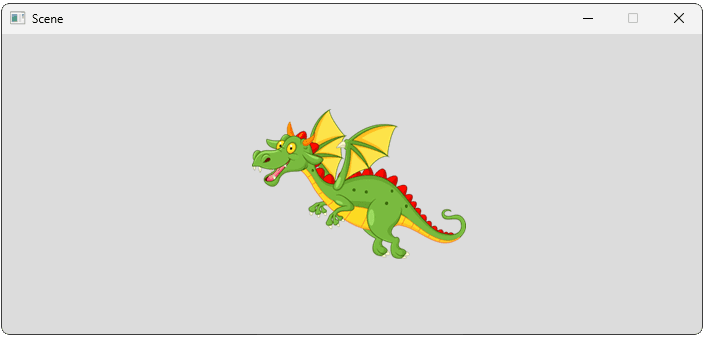
However, if we imagined a real camera positioned at in our world, this is not exactly what we'd expect the camera to see. We currently have the view space defined as below, where the origin is indeed the location of the camera, but the camera can only see things to its top right:
Instead, we want the camera to sees things "in front" of it. We can represent this as a rectangle positioned such that the camera is in the center of it. Or, equivalently, a view space where the origin represents the center:
The size of this rectangle is determined by the camera's field of view. For now, we'll keep things simple and make our field of view the same size as our world space - a 1400 x 600 rectangle.
To transform our objects from world space to the definition of view space that includes the origin change, our ToViewSpace() function needs to be slightly expanded. Visually, we can imagine one way of achieving our goal would be moving our camera down and to the left by half of our rectangle's height and width:

But again, our camera doesn't really move in view space - it's position is always . So instead, we replicate the effect by moving our objects by the same amount but in the opposite direction - up and to the right.
In view space, we move objects right by increasing their x position, and up by increasing their y position:
// Scene.h
// ...
class Scene {
// ...
private:
Vec2 ToViewSpace(const Vec2& Pos) const {
// Before
return {
Pos.x - CameraPosition.x,
Pos.y - CameraPosition.y
};
// After
return {
(Pos.x - CameraPosition.x) + WorldSpaceWidth / 2,
(Pos.y - CameraPosition.y) + WorldSpaceHeight / 2
};
}
// ...
};We should now see the view we'd expect from a camera positioned at in the world space:
We can reposition our camera to the center of the world space to get our original perspective back, but now calculated using a fully implemented view space transformation:
// Scene.h
// ...
class Scene {
// ...
private:
// Unchanged
float WorldSpaceWidth{1400};
float WorldSpaceHeight{600};
// ...
Vec2 CameraPosition{
WorldSpaceWidth / 2, WorldSpaceHeight / 2
}
};Player-Controlled Camera
Let's update our scene to give players control of the camera. Our scene is already receiving events through it's HandleEvent() functions. We can examine the events flowing through our scene to detect if the player has pressed one of their arrow keys.
If they have, we can update our camera's position:
// Scene.h
// ...
class Scene {
public:
// ...
void HandleEvent(SDL_Event& E) {
if (E.type == SDL_KEYDOWN) {
switch (E.key.keysym.sym) {
case SDLK_LEFT:
CameraPosition.x -= 20;
break;
case SDLK_RIGHT:
CameraPosition.x += 20;
break;
case SDLK_UP:
CameraPosition.y += 20;
break;
case SDLK_DOWN:
CameraPosition.y -= 20;
break;
}
}
for (GameObject& Object : Objects) {
Object.HandleEvent(E);
}
}
// ...
};Attached Cameras
In many games, the camera is attached to some other object in the scene, often the character that the player is controlling. We can replicate this in a few ways. The most direct is to simply examine the player character's position, and set the camera's position accordingly.
CameraPosition = Player.Position;In cases like this, we should be mindful of when our objects are being updated in each iteration of our game loop. To prevent our camera lagging one frame behind the player, we should set the camera's position after the player's position has been updated for the next frame, but before we start rendering that frame.
In our case, our player can't move yet, but a good time in general to perform the update would be after our player-controlled character ticks, but before the scene renders. We'll assume the GameObject that the player is controlling is the first in the scene's Objects array:
// Scene.h
// ...
class Scene {
public:
// ...
void Render(SDL_Surface* Surface) {
CameraPosition = Objects[0].Position;
// Remaining code unmodified
SDL_GetClipRect(Surface, &Viewport);
for (GameObject& Object : Objects) {
Object.Render(Surface);
}
}
// ...
};Our camera should now center its view on the player character. Remember that the player's Position denotes the top-left corner of their image, so our object's rendered appearance will appear slightly lower and to the right of their actual Position:
Let's update our HandleEvent() so that arrow keys move the player instead of the camera:
// Scene.h
// ...
class Scene {
public:
// ...
void HandleEvent(SDL_Event& E) {
if (E.type == SDL_KEYDOWN) {
switch (E.key.keysym.sym) {
case SDLK_LEFT:
Objects[0].Position.x -= 20;
break;
case SDLK_RIGHT:
Objects[0].Position.x += 20;
break;
case SDLK_UP:
Objects[0].Position.y += 20;
break;
case SDLK_DOWN:
Objects[0].Position.y -= 20;
break;
}
}
for (GameObject& Object : Objects) {
Object.HandleEvent(E);
}
}
// ...
};The player can now move their character around the scene. And, because the camera is attached to the player's character, the camera will indirectly move too:
Typically, we don't want the camera to match the character's position exactly. Most games want to apply some offset to the positioning, such that the scene is framed in a way that looks better.
Below, our camera still follows the player character, but is positioned 600 units to the right, and 100 units higher:
// Scene.h
// ...
class Scene {
public:
// ...
void Render(SDL_Surface* Surface) {
CameraPosition = Objects[0].Position
+ Vec2{600, 100};
// Unchanged
SDL_GetClipRect(Surface, &Viewport);
for (GameObject& Object : Objects) {
Object.Render(Surface);
}
}
// ...
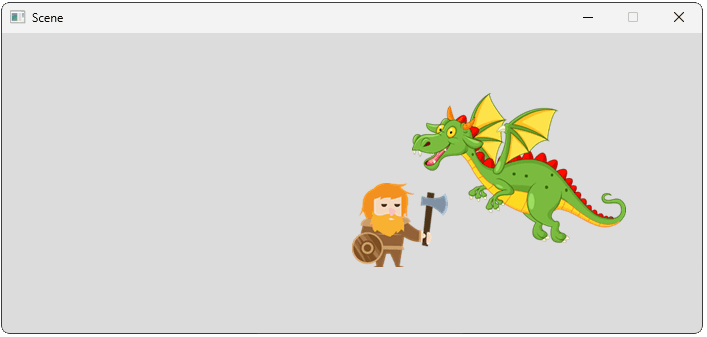
};This returns us to our original composition, where our dwarf is currently positioned at , and our camera is attached to the dwarf but with a offset. Adding these, we get a final camera position of , which is at centre of our simple world:
Complete Code
Our updated Scene class is available below:
Summary
In this lesson, we've explored the techniques involved in creating a 2D camera system that can be controlled directly or attached to a game character. Key takeaways:
- Camera systems use coordinate space transformations to create the illusion of movement through the game world
- Converting between world space and view space requires understanding the camera's position and field of view
- In 2D games, cameras typically use orthographic projections which represent a simple rectangular view
- Camera positioning can be manually controlled or automatically attached to follow characters
- Applying offsets to attached cameras allows for better visual composition of game scenes
- Coordinate transformations should happen in the correct order: world space view space screen space
Physical Motion
Create realistic object movement by applying fundamental physics concepts