Physical Motion
Create realistic object movement by applying fundamental physics concepts
This legacy content uses SDL2
An updated version using SDL3 is available
In this lesson, we'll explore fundamental physics principles and how to implement them in our games. We'll explore how to represent position, velocity, and acceleration using our vector system, and how these properties interact over time.
By the end, you'll understand how to create natural movement, predict object trajectories, and integrate player input with physics systems.
We'll be working with the basic Scene, GameObject, and Vec2 types we created previously:
Our game loop is provided below within main.cpp, as well as our supporting Image and Window components. We won't be changing any of these in this chapter:
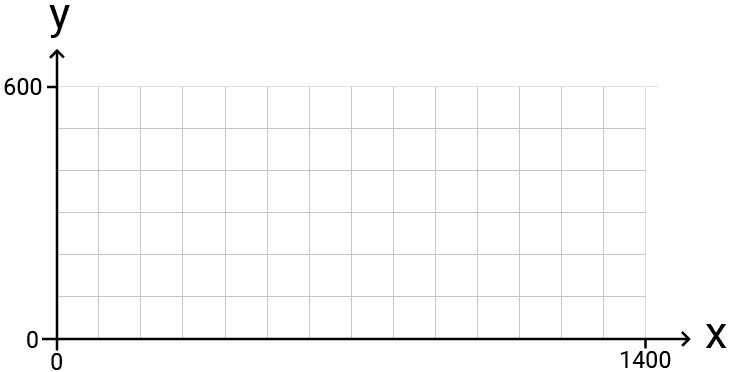
We want our physics calculations to be done in world space. We'll use the same world space definition we created in the previous section, where the origin is at the bottom left, increasing x values corresponds to rightward movement, whilst increasing y values corresponds to upward movement. Initially, all of our objects are in the range to :
To render our objects, our world space positions are converted to screen space within the Scene class. This is the same class we used in the previous section but, to keep things simple, we've removed the camera and are just doing a direct world space to screen space conversion:
// Scene.h
// ...
class Scene {
public:
Vec2 ToScreenSpace(const Vec2& Pos) const {
auto [vx, vy, vw, vh]{Viewport};
float HorizontalScaling{vw / WorldSpaceWidth};
float VerticalScaling{vh / WorldSpaceHeight};
return {
vx + Pos.x * HorizontalScaling,
vy + (WorldSpaceHeight - Pos.y) * VerticalScaling
};
}
// ...
private:
SDL_Rect Viewport;
float WorldSpaceWidth{1400};
float WorldSpaceHeight{600};
// ...
};Position and Displacement
Previously, we've seen how we can represent the position of an object in a 2D space by using a 2D vector:
// GameObject.h
// ...
class GameObject {
public:
// ...
Vec2 Position;
// ...
};The initial positions of our GameObject instances are set through the constructor:
// GameObject.h
// ...
class GameObject {
public:
GameObject(
const std::string& ImagePath,
const Vec2& InitialPosition,
const Scene& Scene
) : Image{ImagePath},
Position{InitialPosition},
Scene{Scene} {}
// ...
};Our Scene object is setting these initial positions when they construct our GameObjects:
// Scene.h
// ...
class Scene {
public:
Scene() {
Objects.emplace_back("dwarf.png", Vec2{300, 400}, *this);
}
// ...
};Specifically, this is the object's position relative to the origin of our space. This is sometimes referred to as its displacement.
Units
When working with physics systems, it can be helpful to assign some real-world unit of measurement to this displacement.
For example, the Unity game engine uses meters, whilst Unreal Engine uses centimeters. We're free to choose whichever we want, but it's important to be consistent across all our objects. For these examples, we'll use meters as our unit of distance.
This choice directly impacts how we would define our world space. In the previous section, our world space ranged from to .
If that represents meters, our world space is much larger than we need. Let's shrink it down to a width of and height of :
// Scene.h
// ...
class Scene {
// ...
private:
float WorldSpaceWidth{14}; // meters
float WorldSpaceHeight{6}; // meters
};Naturally, any object positioned in this space should adopt the same units of measurement. We'll update our dwarf's initial position to be :
// Scene.h
// ...
class Scene {
public:
Scene() {
Objects.emplace_back("dwarf.png", Vec2{3, 4}, *this);
}
// ...
};A position vector of {3, 4} represents the object being displaced 3 meters horizontally from the origin, and 4 meters vertically. In total, the object is 5 meters from the origin, as
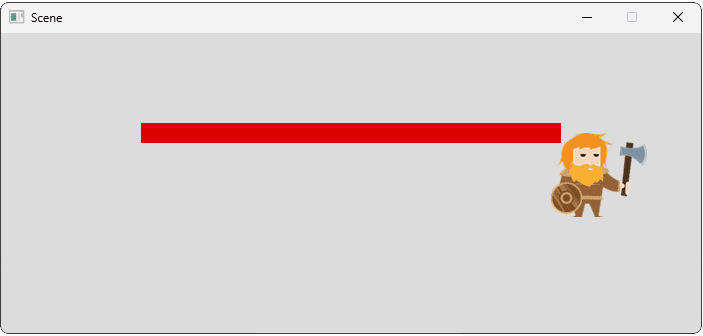
Remember, in our simple 2D rendering setup, an object's position represents the top left corner of its image. We could change that if we want, but we'll keep it simple for now. To visualize our object's motion, our screenshots include a red rectangle showing the object's Position on each frame:

Velocity
Velocity is the core idea that allows our objects to move. That is, a velocity represents a change in an object's displacement over some unit of time. We've chosen meters, , as our unit of position, and we'll commonly use seconds, , as our unit of time. As such, velocity will be measured in meters per second or
As movement has a direction, our velocity will also have a direction, so we'll use our Vec2 type:
// GameObject.h
// ...
class GameObject {
public:
// ...
Vec2 Velocity{1, 0};
// ...
};For example, if an object's velocity is {x = 1, y = 0}, our object is moving meter to the right every second.
We can implement this behavior in our Tick() function. Our velocity represents how much we want our displacement to change every second, but our Tick() function isn't called every second. Therefore, we need to scale our change in velocity by how much time has passed since the previous tick.
We can do this by multiplying our change by our tick function's DeltaTime argument:
// GameObject.h
// ...
class GameObject {
public:
// ...
void Tick(float DeltaTime) {
Position += Velocity * DeltaTime;
}
// ...
};
Our application should be ticking multiple times per second, so our DeltaTime argument will be a floating point number between 0 and 1. Multiplying a vector by this value will have the effect of reducing its magnitude but, after one second of tick function invocations, we should see our displacement change by approximately the correct amount.
We can temporarily add a Time variable and some logging to confirm this:
// GameObject.h
// ...
class GameObject {
public:
// ...
float Time{0};
void Tick(float DeltaTime) {
Position += Velocity * DeltaTime;
Time += DeltaTime;
std::cout << "\nt = " << Time
<< ", Position = " << Position;
}
// ...
};t = 0.0223181, Position = { x = 3.02232, y = 4 }
t = 0.0360435, Position = { x = 3.03604, y = 4 }
...
t = 0.9969611, Position = { x = 3.99696, y = 4 }
t = 0.9983365, Position = { x = 3.99833, y = 4 }
t = 1.0000551, Position = { x = 4.00005, y = 4 }Speed
The concepts of speed and velocity are closely related. The key difference is that velocity includes the concept of direction, whilst speed does not. Accordingly, velocity requires a more complex vector type, whilst speed is a simple scalar, like a float or an int.
To calculate the speed associated with a velocity, we simply calculate the length (or magnitude) of the velocity vector. So, in mathematical notation, .
Below, we calculate our speed based on the object's Velocity variable. We also do some vector arithmetic to confirm our simulation really is moving our object at that speed:
// GameObject.h
// ...
class GameObject {
public:
// ...
void Tick(float DeltaTime) {
Vec2 PreviousPosition{Position};
Position += Velocity * DeltaTime;
std::cout << "\nIntended Speed = "
<< Velocity.GetLength()
<< ", Actual Speed = "
<< Position.GetDistance(PreviousPosition)
/ DeltaTime;
}
//...
};Intended Speed = 1, Actual Speed = 1.00005
Intended Speed = 1, Actual Speed = 0.999974
Intended Speed = 1, Actual Speed = 1.00009
...It's often required to perform this calculation in the opposite direction, where we want to travel at a specific speed in a given direction. Rather than defining a Velocity member for our objects, we could recreate it on-demand by multiplying a direction vector by a movement speed scalar:
// GameObject.h
// ...
class GameObject {
public:
// ...
// Now calculated within Tick()
Vec2 Velocity{1, 0};
Vec2 Direction{1, 0};
float MaximumSpeed{1}; // meters per second
void Tick(float DeltaTime) {
Vec2 Velocity{
Direction.Normalize() * MaximumSpeed};
Position += Velocity * DeltaTime;
Time += DeltaTime;
std::cout << "\nt = " << Time
<< ", Position = " << Position;
}
};t = 0.0180497, Position = { x = 3.01805, y = 4 }
t = 0.0251397, Position = { x = 3.02514, y = 4 }
...
t = 0.997757, Position = { x = 3.99776, y = 4 }
t = 0.999264, Position = { x = 3.99926, y = 4 }
t = 1.00025, Position = { x = 4.00025, y = 4 }We covered how to use vectors to define movement in more detail earlier in the course:
Moving Objects with Vectors
Explore how to use vectors for representing positions, directions, and implementing speed-limited movement in games.
Acceleration
Just as velocity is the change in displacement over time, acceleration is the change in velocity over time. Therefore, let's figure out what the units of acceleration should be:
- Displacement is measured in meters:
- Velocity, as the change in displacement over time, is measured in meters per second:
- Acceleration, as the change in velocity over time, is measured in meters per second per second: . This is equivalent to , usually written as
Acceleration also has a direction, so is typically represented by a vector:
// GameObject.h
// ...
class GameObject {
public:
// ...
// Accelerate one meter per second per
// second to the left
Vec2 Acceleration{-1, 0};
// ...
};Much like how we used the velocity to update an object's displacement on tick, we can use acceleration to update an object's velocity:
// GameObject.h
// ...
class GameObject {
public:
// ...
// meters per second
Vec2 Velocity{0, 0};
// meters per second per second
Vec2 Acceleration{0, 1};
void Tick(float DeltaTime) {
Velocity += Acceleration * DeltaTime;
// Unchanged
Position += Velocity * DeltaTime;
}
// ...
};Deceleration
Acceleration doesn't necessarily cause an object's speed to increase. If the direction of acceleration is generally in the opposite direction to the object's current velocity, that acceleration will cause the speed to reduce.
This is sometimes called "deceleration", but the mechanics are identical. In the following code example, our object has an initial velocity of , and constant acceleration of :
// GameObject.h
// ...
class GameObject {
public:
// ...
// meters per second
Vec2 Velocity{1, 0};
// meters per second per second
Vec2 Acceleration{-1, 0};
void Tick(float DeltaTime) {
Velocity += Acceleration * DeltaTime;
// Unchanged
Position += Velocity * DeltaTime;
Time += DeltaTime;
std::cout << "\nt = " << Time
<< ", x = " << Position.x
<< ", dx = " << Velocity.x;
}
// ...
};The initial position of , initial velocity of , and constant acceleration of has the following effects:
- Because of the initial velocity, our object is initially moving right (in the positive direction). However, its acceleration is pointing to the left, thereby reducing that rightward velocity over time.
- After one second () the acceleration has reduced the velocity to and the object momentarily stops moving.
- From then on, the acceleration and velocity are both pointing left, so the object's velocity starts to increase again, but now in the opposite direction to its initial velocity. By , the object's velocity has become and its position is back where it started ()
- If the acceleration doesn't change, the object will continue to move left at ever-increasing speed.
t = 0.0179667, x = 3.01764, dx = 0.982033
t = 0.0358256, x = 3.03486, dx = 0.964174
...
t = 0.999145, x = 3.49913, dx = 0.000855972
t = 1.00022, x = 3.49913, dx = -0.000214628
...
t = 1.99998, x = 2.99812, dx = -0.999977
t = 2.0007, x = 2.99739, dx = -1.0007
...
t = 2.99909, x = 1.49116, dx = -1.99909
t = 3.00025, x = 1.48884, dx = -2.00025Gravity
The most common accelerative force we simulate is gravity - the force that causes objects to fall to the ground. On Earth, the acceleration caused by gravity is approximately towards the ground. As such, an object falling with this acceleration will feel realistic:
// GameObject.h
// ...
class GameObject {
public:
// ...
Vec2 Acceleration{0, -9.8};
// ...
};Later in the chapter, we'll see how we can stop an object from falling once it hits the ground, or any other surface.
Trajectories
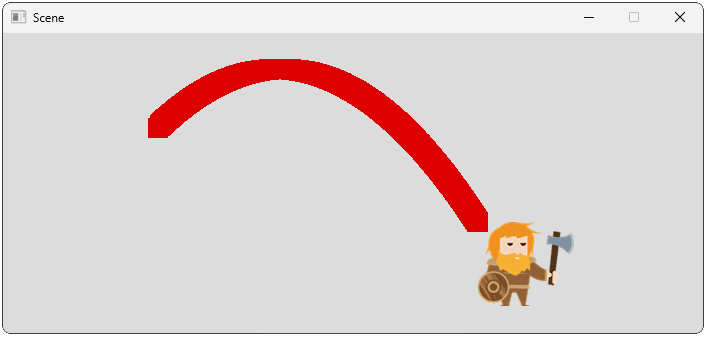
A trajectory is the path that an object takes through space, given its initial velocity and the accelerative forces acting on it. The most common trajectory we're likely to recognize is projectile motion. For example, when we throw an object, we apply some initial velocity to it and, whilst it flies through the air, gravity is constantly accelerating it towards the ground.
This causes the object to follow a familiar, arcing trajectory:
// GameObject.h
// ...
class GameObject {
public:
// ...
Vec2 Velocity{5, 5};
Vec2 Acceleration{0, -9.8};
// ...
};
The Relationship Between Displacement, Velocity, and Acceleration
In the previous sections, we saw that acceleration updates velocity, and velocity updates displacement. It's worth spending a moment reflecting on the implications of these relationships, as they're not immediately intuitive.
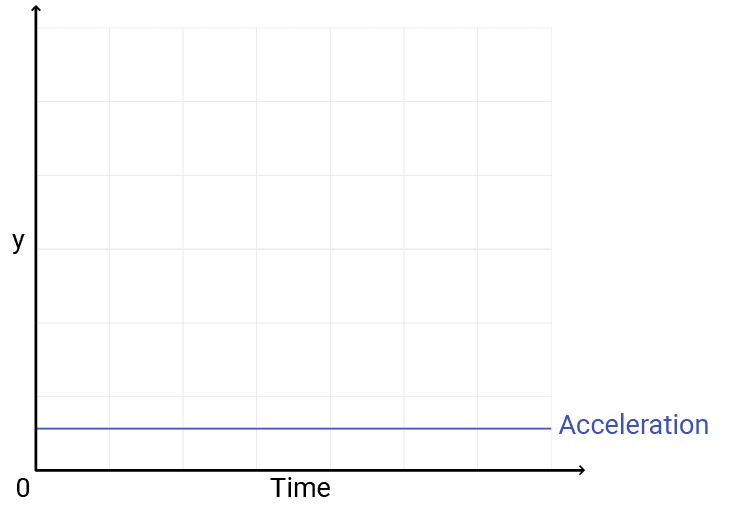
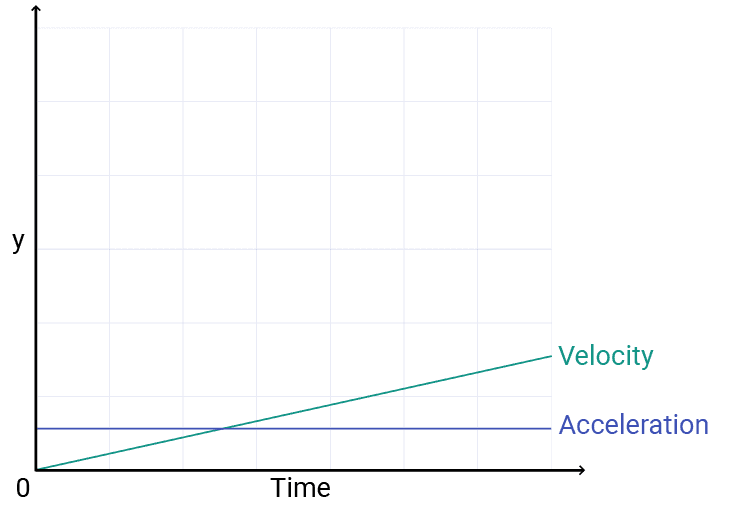
For example, imagine we have an acceleration that is pointing downwards (in the positive direction) with a magnitude that is not changing over time. On a chart, our acceleration value would be represented as a straight line:
However, as long as the acceleration is not zero, it is continuously changing our velocity value over time. So, a constant acceleration results in a linear change in velocity:
But velocity is also changing our displacement over that time. If our velocity is constantly increasing, that means our displacement is not only changing over time, but the rate at which it is changing is also increasing. On our chart, the exponential increase looks like this:
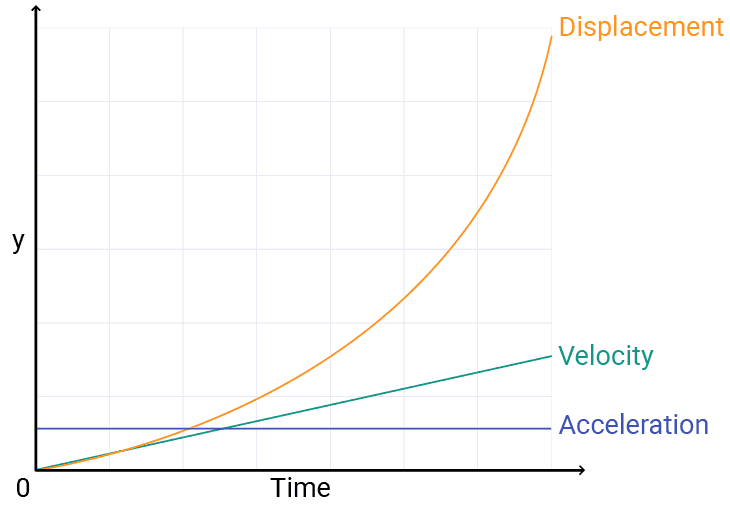
In the next lesson, we'll introduce concepts like drag and friction, which counteract these effects and ensure that the effect of acceleration doesn't result in velocities and displacements that quickly scale towards unmanageably huge numbers.
Combining Player Input with Physics
When making games, our physics simulations typically need to interact in a compelling way with user input. For example, if our player tries to move their character to the right, we need to intervene in our physics simulation to make that happen.
There is no universally correct way of doing that - the best approach just depends on the type of game we're making, and what feels most realistic or fun when we're playing.
A common approach is to have player input directly influence an object's velocity or acceleration, and then have the physics system incorporate that change into its simulation.
This is usually easy to set up as, within each frame, player input is processed before the physics simulation updates. In our context, that means that HandleEvent() happens before Tick(). Below, we let the player set the horizontal component of their character's velocity before the physics simulation ticks:
// GameObject.h
// ...
class GameObject {
public:
// ...
void HandleEvent(SDL_Event& E) {
if (E.type == SDL_KEYDOWN) {
switch (E.key.keysym.sym) {
case SDLK_LEFT:
Velocity.x = -5;
break;
case SDLK_RIGHT:
Velocity.x = 5;
break;
}
}
}
// ...
};
Later in this chapter, we'll expand this to include collisions in our physics simulations, which will stop the player from running through walls or falling through the floor.
Equations of Motion and Motion Prediction
Naturally, a lot of academic effort has been made investigating and analyzing the physical world. We can apply those learnings to our own projects when we need to simulate natural processes, such as the motion of objects.
Some of the most useful examples are the SUVAT equations. In scenarios where our acceleration isn't changing, the SUVAT equations establish relationships between 5 variables:
- is displacement
- is the initial velocity
- is the final velocity
- is acceleration
- is time
The equations are as follows:
It's typically the case that the second equation (or rearrangements of the second equation) are most useful. For example, if we know an object's current position, current velocity, and acceleration, we can predict where it will be in the future.
#include <iostream>
int main() {
float u{1}; // velocity
float a{1}; // acceleration
float t{10}; // time
// displacement
float s = u * t + 0.5 * a * t * t;
std::cout << "In " << t << " seconds I "
"predict I will have moved "
<< s << " meters";
float CurrentDisplacement{3};
std::cout << "\nMy new displacement would be "
<< CurrentDisplacement + s << " meters";
}In 10 seconds I predict I will have moved 60 meters
My new displacement would be 63 metersHow accurate the prediction will be depends on how much the acceleration changes over the time interval. If the acceleration doesn't change at all, our prediction will be exactly correct.
Using Vectors
Our previous equations and examples were using scalars for displacements, velocities, and acceleration. This is fine if we only care about motion in a straight line, but what about motion in a 2D or 3D space?
Thanks to the magic of vectors, we can drop them straight into the same equations:
#include <iostream>
#include "Vec2.h"
int main() {
Vec2 u{1, 2}; // 2D velocity
Vec2 a{1, 2}; // 2D acceleration
float t{10}; // time
// 2D displacement
Vec2 s = u * t + 0.5 * a * t * t;
std::cout << "In " << t << " seconds I "
"predict I will have moved "
<< s << " meters";
std::cout << "\nThis is " << s.GetLength()
<< " meters in total";
Vec2 CurrentDisplacement{3, 5};
std::cout << "\nMy new displacement would be "
<< CurrentDisplacement + s << " meters";
}In 10 seconds I predict I will have moved { x = 60, y = 120 } meters
This is 134.164 meters in total
My new displacement would be { x = 63, y = 125 } metersThe equivalent to all of the SUVAT equations using vectors is below.
There are two things to note from the vector form of these equations.
Firstly, the time variable () is a scalar, whilst all other variables are vectors. It's common in mathematical notation to make vector variables bold
Secondly, has been slightly modified from its scalar counterpart . This is to remove some ambiguity associated with vector multiplication.
The equations are equivalent, but it may not be entirely clear what expressions like , , and mean when , , , and are vectors.
Summary
Physics is the backbone of realistic movement in games. In this lesson, we've explored how to implement fundamental motion physics in C++ using SDL, transforming static objects into dynamic entities that behave naturally. Key takeaways:
- Position and displacement are represented as 2D vectors that define an object's location in world space
- Velocity is the rate of change in position over time, measured in meters per second
- Acceleration changes velocity over time and is measured in meters per second squared
- The relationship between displacement, velocity, and acceleration creates realistic motion
- The SUVAT equations allow us to predict object movement given initial conditions
- Vector mathematics enables us to represent and calculate motion in multiple dimensions
- Physics can be combined with player input to create responsive game controls
- Consistent units (like meters and seconds) are crucial for accurate physics simulations
Force, Drag, and Friction
Learn how to implement realistic forces like gravity, friction, and drag in our physics simulations