Force, Drag, and Friction
Learn how to implement realistic forces like gravity, friction, and drag in our physics simulations
This legacy content uses SDL2
An updated version using SDL3 is available
Now that we understand basic motion in our game engine, it's time to explore the forces that drive that motion. In this lesson, we'll implement several physical forces including gravity, drag, and friction.
We'll see how each affects our game objects differently based on their properties like mass and velocity. These techniques will allow you to create more realistic and engaging gameplay.
In this lesson, we'll continue to use the basic application loop and components we introduced in the previous lesson. We'll mostly be working in the GameObject class in this lesson.
It currently looks like the following, with the most notable characteristics being the Position, Velocity, and Acceleration vectors, and the Tick() function that updates them:
// GameObject.h
#pragma once
#include <SDL.h>
#include "Vec2.h"
#include "Image.h"
class Scene;
class GameObject {
public:
GameObject(
const std::string& ImagePath,
const Vec2& InitialPosition,
const Scene& Scene ) : Image{ImagePath},
Position{InitialPosition},
Scene{Scene} {}
void HandleEvent(SDL_Event& E) {}
void Tick(float DeltaTime) {
Velocity += Acceleration * DeltaTime;
Position += Velocity * DeltaTime;
}
void Render(SDL_Surface* Surface);
private:
Vec2 Position{0, 0};
Vec2 Velocity{0, 0};
Vec2 Acceleration{0, 0};
Image Image;
const Scene& Scene;
};Forces
In the previous section, we saw that a change in an object's speed, or velocity, is called acceleration. Something that causes an object to accelerate is called a force.
For example, the acceleration from gravity is caused by the gravitational force. Or, by simply pushing an object, we are exerting a force on it, causing it to accelerate.
Mass
More powerful forces cause more acceleration but, conversely, heavier objects require more force to accelerate. This relationship has the following equation, which is usually shorted to :
For example, if we had an object with a mass of two kilograms (), and we wanted to accelerate it by , we would multiply these two values to calculate the required force:
These units are given a simpler name: Newtons, abbreviated :
Directional Forces
Forces can apply acceleration in a specific direction so, like other directional types, we can represent them using vectors:
Vec2 Force;Similarly, we can determine the overall magnitude of a force by calculating the magnitude of that vector:
Vec2 Force{3, 4};
std::cout << Force.Length();5The relationship applies whether and have a scalar type like float, or a vector type like Vec2.
Unlike velocity, whose magnitude is called speed, the magnitudes of force and acceleration do not have a specific name. In mathematical writing, we'd differentiate them in the typical ways, such as using bold for vectors and vertical bars to denote the magnitude of vectors. For example: and .
However, informally, people often use "magnitude" and "force" for both the vector and scalar forms. We can usually infer which form is being used based on the context. If it's the name of a variable in a program, we can generally tell based on the data type (eg float vs Vec2)
Implementing Forces and Reaction
Practically, the main reason we may want to implement forces in our games is for scenarios where we have a single force that we want to affect many objects.
For example, let's imagine we want to simulate a gust of wind that acts on our whole scene. This becomes quite easy if our objects have some generic ApplyForce() function, and they each have an individual Mass variable to use in the relationship:
// Scene.h
// ...
class Scene {
public:
// ...
void Tick(float DeltaTime) {
for (GameObject& Object : Objects) {
Object.ApplyForce({1, 0});
Object.Tick(DeltaTime);
}
}
// ...
};// GameObject.h
// ...
class GameObject {
public:
// ...
void ApplyForce(const Vec2& Force) {
// TODO: Update Acceleration
}
// ...
private:
float Mass{50};
// ...
};To help with this, the equation can be rearranged as needed. One such rearrangement is , meaning we can calculate the acceleration we need to apply in response to a force by dividing that force by the mass of the object.
For example, if of force is applied to an object of mass , that object should be accelerated by . We can calculate the acceleration that results from a force, and add it to our current Acceleration like this:
// GameObject.h
// ...
class GameObject {
public:
// ...
void ApplyForce(const Vec2& Force) {
Acceleration += Force / Mass;
}
// ...
};The same force applied across all objects in our Scene will now impart a rightward acceleration, and the magnitude of that acceleration will be based on each object's individual mass.
We don't want forces applied in previous frames to accumulate so we need to reset our acceleration to some initial value at the start or end of each frame. Common choices are , or if this is how we're implementing gravity:
// GameObject.h
// ...
class GameObject {
public:
// ...
void Tick(float DeltaTime) {
Velocity += Acceleration * DeltaTime;
Position += Velocity * DeltaTime;
Acceleration = {0, -9.8};
}
// ...
};Multiple Forces
Using vectors makes the application of multiple forces straightforward. We can simply apply each force in turn to the acceleration vector. In this example, the second force counteracts the horizontal acceleration of the first force, and adds some downward force:
// Scene.h
// ...
class Scene {
public:
// ...
void Tick(float DeltaTime) {
for (GameObject& Object : Objects) {
Object.ApplyForce({1, 0});
Object.ApplyForce({-1, -1});
Object.Tick(DeltaTime);
}
}
// ...
};
Vector addition is associative, so we can alternatively combine the force vectors then apply them to the acceleration:
// Scene.h
// ...
class Scene {
public:
// ...
void Tick(float DeltaTime) {
for (GameObject& Object : Objects) {
Object.ApplyForce(
Vec2{0.01, 0} + Vec2{-0.01, -0.01});
Object.Tick(DeltaTime);
}
}
// ...
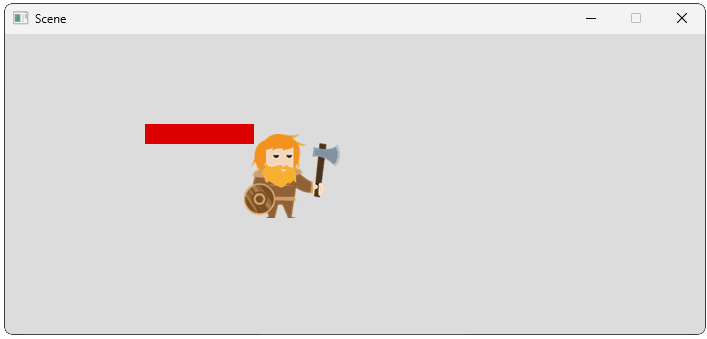
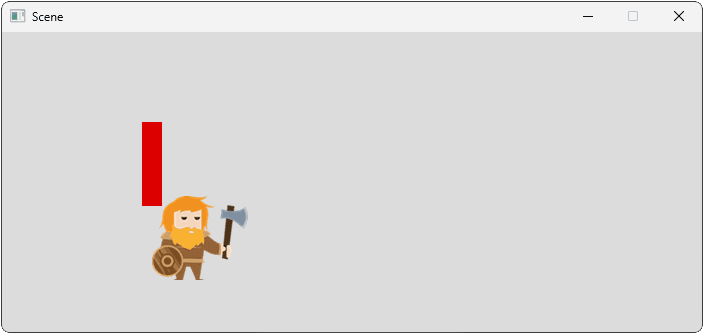
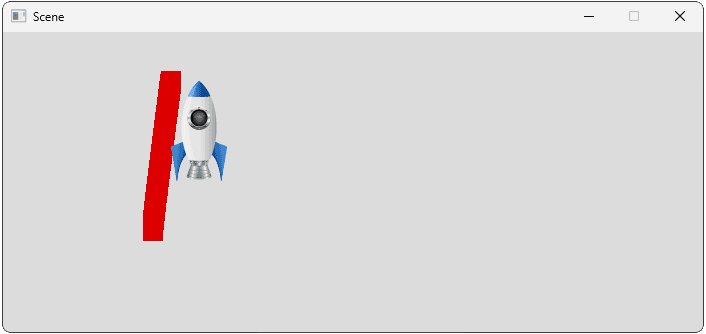
};Below, we model a spaceship taking off, where we have three forces:
- wind applying a mild sideward force from the scene.
- an engine applying an upward force from within the object's class
- gravity trying to force the ship back to the ground, applied directly to the object's
Acceleration
// Scene.h
// ...
class Scene {
public:
// ...
void Tick(float DeltaTime) {
for (GameObject& Object : Objects) {
Object.ApplyForce(WindForce);
Object.Tick(DeltaTime);
}
}
// ...
private:
Vec2 WindForce{10, 0};
// ...
};Remember that forces update our Acceleration, so we should ensure all forces are applied before we use our acceleration value:
// GameObject.h
// ...
class GameObject {
public:
// ...
void Tick(float DeltaTime) {
ApplyForce(EngineForce);
Velocity += Acceleration * DeltaTime;
Position += Velocity * DeltaTime;
Acceleration = {0, -9.8};
}
// ...
private:
Vec2 Acceleration{0, -9.8};
Vec2 EngineForce{0, 500};
// ...
};After combining all forces, our ship moves mostly upwards:
Drag
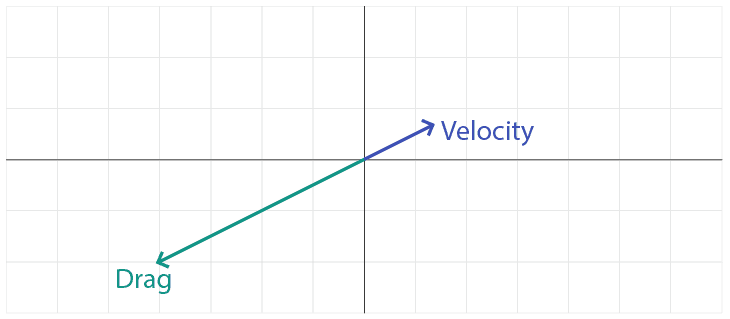
In our everyday lives, we've likely noticed that, when a force stops acting upon a moving object, that object tends to decelerate and eventually come to a stop.
The most common example of drag that we encounter is air resistance. As an object moves through the air, it experiences resistance from the air molecules, creating a force opposing the motion and causing it to gradually slow down.
We can simulate this effect as a decelerating force - that is, a force acting in the opposite direction to the object's current velocity:
Drag is typically represented using a quadratic model, where the magnitude of the force is proportional to the square of the magnitude of the velocity. One way to calculate the square of a vector is to multiply it by its own length, so we can calculate a simple drag force like this:
Vec2 GetDragForce() {
return -Velocity * Velocity.GetLength();
}The -Velocity * Velocity.GetLength() expression means both the direction and magnitude of the drag force are based on the object's current velocity:
- Direction: The unary
-operator ensures the direction of the force is acting in the opposite direction of the velocity because, if we have some vector , then will point in the opposite direction. - Magnitude: By multiplying
Velocityby its own length, the magnitude of the vector returned byGetDragForce()will be the square of the magnitude of the velocity. For example, the vector ) has a magnitude of . If we multiply by , we get , which has a magnitude of . This squaring is exactly what we want for the quadratic model of drag.
We can incorporate the drag force into our physics simulation, ensuring it updates the Acceleration before the Acceleration updates the Velocity:
// GameObject.h
// ...
class GameObject {
public:
// ...
void Tick(float DeltaTime) {
ApplyForce(DragForce());
Velocity += Acceleration * DeltaTime;
Position += Velocity * DeltaTime;
Acceleration = {0, -9.8};
}
// ...
};Drag Coefficients
By itself, -Velocity * Velocity.GetLength() is a relatively simplistic way to represent drag. In the real world, the strength of the drag force depends on a lot of factors, including the size and shape of the object, the nature of its surface, and the particle density of whatever environment it is traveling through (such as air or water).
For example, a race car is designed to minimize the amount of drag it encounters, thereby increasing its maximum speed. A parachute has the exact opposite goal, so it is designed to maximize drag. An object encounters more drag if it's moving through water than if it were moving through air.
Typically, we just simplify all of these characteristics into a simple floating point number called a drag coefficient. We can modify on a per-object basis to modify the strength of the drag force:
// GameObject.h
// ...
class GameObject {
// ...
private:
float DragCoeffficient{0.2};
Vec2 GetDragForce() {
return -Velocity * Velocity.GetLength()
* DragCoefficient;
}
// ...
};Below, we simulate a character falling through the air. Once they deploy their parachute by pressing the spacebar, we increase the drag coefficient to slow their fall:
// GameObject.h
// ...
class GameObject {
public:
// ...
void HandleEvent(SDL_Event& E) {
if (E.type == SDL_KEYDOWN) {
if (E.key.keysym.sym == SDLK_SPACE) {
DeployParachute();
}
}
}
// ...
private:
// ...
float DragCoefficient{0.2};
void DeployParachute() {
DragCoefficient = 30;
}
// ...
};Terminal Velocity
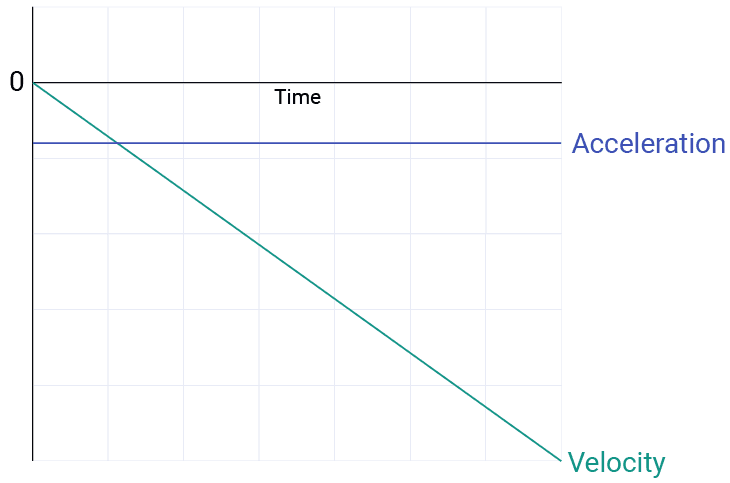
A common scenario we'll be simulating is a scenario where we have a force applying a constant acceleration in a given direction. Examples include an engine accelerating a vehicle forward, or gravity accelerating an object to the ground.
Given the nature of motion, a constant acceleration causes the velocity to change linearly. The relationship between gravity and the velocity of an object falling through the air might look something like this, where both acceleration and velocity point downwards (in the negative y direction):
However, in most scenarios, we also have drag acting on the object. Drag tries to slow the object down, and the strength of that effect increases as the velocity increases. When the velocity gets high enough, that drag force will be equal to the force coming from gravity (or whatever other force was causing the velocity to increase).
At that point, the drag and accelerative force will balance each other out, causing the net acceleration to be zero and the velocity to stop changing. The level at which the velocity stops changing in a given situation is called the terminal velocity or terminal speed.
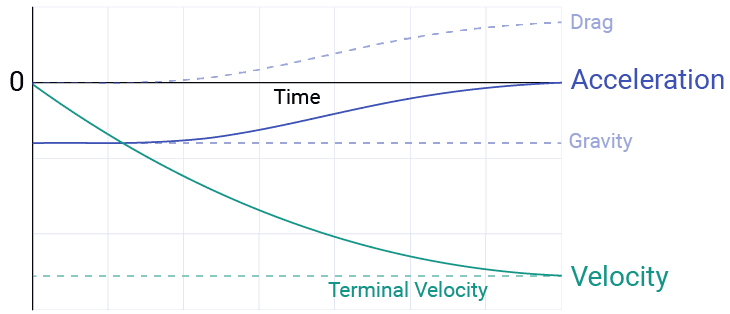
Revisiting our falling character example, we see gravity and drag balance each other out when our fall speed reaches around :
// GameObject.h
// ...
class GameObject {
public:
// ...
void Tick(float DeltaTime) {
ApplyForce(DragForce());
Velocity += Acceleration * DeltaTime;
Position += Velocity * DeltaTime;
if (std::abs(Acceleration.y) < 0.1) {
std::cout << "\nTerminal Velocity: "
<< Velocity;
}
Acceleration = {0, -9.8};
}
// ...
};Terminal Velocity: { x = 0, y = -58.2389 }
Terminal Velocity: { x = 0, y = -58.239 }
Terminal Velocity: { x = 0, y = -58.2391 }
...If we deploy the parachute, thereby increasing the drag coefficient, our maximum falling speed reduces to around :
Terminal Velocity: { x = 0, y = -4.75522 }
Terminal Velocity: { x = 0, y = -4.75534 }
Terminal Velocity: { x = 0, y = -4.75546 }Clamping
Because of the nature of drag calculations, and inherent inaccuracies with floating point numbers, it's somewhat common for objects to decelerate to extremely low velocities, but take an unreasonably long time to completely come to a stop.
This can lead to objects having tiny, twitching movements that look unnatural. To solve this, we typically choose to "clamp" or "snap" values to zero once they get sufficiently small.
It can take some experimenting to choose where to implement this and what values to use, but the following example shows a way to snap any velocities that fall between -0.1 and 0.1 to 0:
// GameObject.h
// ...
class GameObject {
public:
// ...
void Tick(float DeltaTime) {
ApplyForce(DragForce());
Velocity += Acceleration * DeltaTime;
Position += Velocity * DeltaTime;
Acceleration = {0, -9.8};
Clamp(Velocity);
}
// ...
private:
// ...
void Clamp(Vec2& V) {
V.x = std::abs(V.x) > 0.1 ? V.x : 0;
V.y = std::abs(V.y) > 0.1 ? V.y : 0;
}
// ...
};Friction
The final force we may want to consider modeling is friction. Friction acts upon an object that is sliding across another object, such as a skier on a mountain.
Similar to drag, the effect of friction is to cause the object to decelerate. Therefore, the direction of the friction force is opposite to the direction of velocity. The magnitude of the friction force depends on two factors:
is the Greek letter mu, and represents the coefficient of friction between the two objects. Values of depend on the nature of the two surfaces and have been measured and published for many combinations.
For example, the for rubber on tarmac is usually above , whilst for a snowboard on snow it is usually under . For games, we typically just experiment and settle on values that feel good in gameplay.
is called the normal force, which the surface exerts on the object we're calculating friction for. In the simple case of an object moving over a horizontal surface, we can approximate as being equal to the mass of the object multiplied by its downward acceleration.
We won't cover more complex cases here but feel free to research the normal force in more detail if desired.
Implementing Friction
Let's see an example of applying friction to slow down an object. We calculate the magnitude of by multiplying the coefficient, mass, and downward acceleration. We then create a vector of this magnitude that points in the opposite direction of the velocity vector:
// GameObject.h
// ...
class GameObject {
public:
// ...
Vec2 FrictionForce(float DeltaTime) {
// |F| = u * |N|
float Magnitude{FrictionCoefficient
* Mass * -Acceleration.y};
// No friction
if (Magnitude <= 0) return Vec2(0, 0);
// To calculate F, we multiply the magnitude by a
// normalized direction vector that points in the
// opposite direction to the velocity
return -Velocity.Normalize() * Magnitude;
}
// ...
}In its current form, this friction force can overpower small velocities, therefore moving objects in the opposite direction rather than simply stopping them.
To solve this, we can calculate the magnitude of the stopping force that would be required to reduce the object's velocity to , and ensure our friction force isn't stronger than that. Remember, , and :
// GameObject.h
// ...
class GameObject {
public:
// ...
Vec2 FrictionForce(float DeltaTime) {
// How much force can friction apply
float MaxMagnitude{FrictionCoefficient
* Mass * -Acceleration.y};
// There is no friction
if (MaxMagnitude <= 0) return Vec2(0, 0);
// How much force is required to stop the
// object right now
float StoppingMagnitude{Mass *
Velocity.GetLength() / DeltaTime};
// Return the smaller of the two forces
return -Velocity.Normalize() * std::min(
MaxMagnitude, StoppingMagnitude);
}
// ...
};Adding our friction simulation to our Tick() function might look like the following. As before, we should apply all of our forces before we use our Acceleration to update the Velocity, but it doesn't make a significant difference whether we apply friction or drag first.
Note that we need the downforce from gravity for our friction calculation to work correctly, but we'll add a check to ensure it doesn't cause our objects to fall through the floor. We'll introduce floor collisions later in the chapter to create a more robust way of doing this:
// GameObject.h
// ...
class GameObject {
public:
// ...
void Tick(float DeltaTime) {
ApplyForce(FrictionForce(DeltaTime));
ApplyForce(DragForce());
Velocity += Acceleration * DeltaTime;
Position += Velocity * DeltaTime;
Acceleration = {0, -9.8};
Clamp(Velocity);
// Don't fall through the floor
if (Position.y < 2) {
Position.y = 2;
Velocity.y = 0;
}
}
// ...
};Changing Friction
As with drag, we can update our friction coefficient at run-time based on our game state.
Below, we modify the amount of friction an object encounters based on its position in the world. We reduce the friction coefficient when the object is in an icy area, and set it to 0 (removing the effect of friction entirely) when it's not making contact with the ground:
// GameObject.h
// ...
class GameObject {
public:
// ...
float GetFrictionCoefficient() {
// Assuming a vertical position <= 2 means
// the object is on the ground
if (Position.y > 2) {
// Object isn't on the ground
return 0;
}
if (Position.x > 5 && Position.x < 6) {
// Area from x=5 to x=6 is icy
return 0.1;
}
// Default friction amount
return 0.5;
}
Vec2 FrictionForce(float DeltaTime) {
float MaxMagnitude{GetFrictionCoefficient()
* Mass * -Acceleration.y};
// The rest of the function is unchanged
if (MaxMagnitude <= 0) return Vec2(0, 0);
float StoppingMagnitude{Mass *
Velocity.GetLength() / DeltaTime};
return -Velocity.Normalize() * std::min(
MaxMagnitude, StoppingMagnitude);
}
// ...
};Complete Code
A complete version of our GameObject class that implements all of the techniques we covered in this lesson is available below:
Summary
In this lesson, we've explored how to implement forces in our game physics system. We've seen how forces and mass interact to produce acceleration, and how multiple forces can be combined to create complex behaviors.
We've also implemented realistic physical effects like drag and friction that add depth to our simulation. Key takeaways:
- Forces cause acceleration according to the equation
- Each game object can have its own mass, affecting how it responds to forces
- Multiple forces can be applied simultaneously, and they combine through vector addition
- Drag produces a force opposite to an object's velocity, with magnitude proportional to velocity squared
- Friction slows objects moving across surfaces, with magnitude dependent on the normal force
- Terminal velocity occurs when forces like gravity and drag balance each other out
- Clamping can be used to prevent tiny residual velocities from causing visual jitter
Momentum and Impulse Forces
Add explosions and jumping to your game by mastering momentum-based impulse forces